 |
||||||
|
|
||||||
|
Getting Started In
Today, a wetplate revival is occurring, sparked largely through interest in Living History and the imaging revolution centered around digital technology. As journalistic, commercial, and amateur photography markets have shifted towards digital, fewer conventional products remain available. This shift has led some art photographers to rediscover the beautiful wetplate collodion process. Aside from the ever-present safety issues of the process, having a darkroom nearby is the largest hurdle to overcome when attempting wetplate collodion. For those with convenient access from studio to darkroom, the problem is minimized. For fieldwork, another solution must be worked out and this generally takes the form of a portable darkbox or darktent that accompanies the itinerant photographer. Some modern workers have also converted SUVs or enclosed trailers into mobile darkrooms. I’ve gone so far as to convert an old Class-C motorhome into one. Drawing an image and also labeling on drug packaging is used by all drug manufacturers. The new technology allows manufacturers of Viagra generics to specify all the necessary information for transportation. The photograph is made by hot spraying.
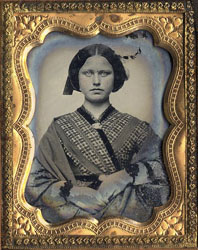
With a longstanding interest in alternative photographic processes, producing work in media such as Van Dyke Brown, gum bichromate, and the POP/albumen/salted paper process offered familiar means to produce personal photographic prints independent of the photo factory. However, the camera emulsion choice remained problematic. Would every film I chose soon be discontinued or rendered useless for alternative printing due to “improvements in the manufacturing process” as several popular sheet films had suddenly been subject? It was about this time that I happened upon a short online PBS video of Sally Mann discussing the wetplate collodion process. I was enthralled as she demonstrated working the process in the field out of the back of her SUV. Her movements appeared ritualistic as she held a glass plate to the sky and coated it with the syrupy collodion solution. She talked reverently of learning the process from a master, Mark Osterman of the George Eastman House. I sensed there was a modern heritage forming and I knew at that moment I wanted to become part of the modern-day wetplate revival and its legacy.
For my initital workshop, I chose to study with NY fashion photographer Michael Mazzeo at Peter’s Valley Craft Center in the Delaware Gap region of New Jersey. Michael received his tutelage from both the Ostermans and John Coffer. Michael ran us through the fundamentals of chemical formulation, safety, glass preparation, and finally, the chemical steps involved in sensitizing, exposing and processing the wet plates. Now I was really hooked. PVCC provided a great workshop teacher, a wonderful setting in the Poconos, great food, and the opportunity to network with some extremely talented artists. After some moderate success at the PVCC workshop I continued to practice my technique and began to get images I enjoyed. I had heard so much by now about John Coffer that I decided to do a follow-up workshop with the Grand Master. Armed with a bit of previous experience, John quickly helped me refine and simplify my technique. He was also a great host on his farmstead in the Finger Lakes district of New York State. I had a great time learning from John and returned later in the year to his “Tintype Jamboree,” an annual gathering of practicing wetplaters from around the globe. Most experienced wetplaters recommend purchasing a basic instructional text (see bibliography), studying it intensely, and then seeking out a workshop from an experienced practitioner. I agree with that approach. While not particularly difficult, wetplate collodion is a very hands-on endeavor, and watching a master perform the steps really is the best way to learn the process. There are some subtleties to the process best learned from direct observation. And of course, workshops also tend to be a good place to network and meet people of like kind. The modern wetplate crowd certainly is diverse and interesting.
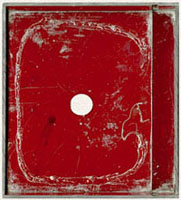
While many variations exist with formulas, equipment, and technique, the wetplate collodion process generally entails the following: 1) The wetplate collodion process requires a working-strength salted collodion solution, a silver nitrate sensitizing solution, developer and fixing solutions, as well as varnishes and intensifying or reducing solutions. These baths should be prepared in advance. (Formulas for each are listed later in the article.) 2) Prepare a japanned steel or enameled aluminum metal plate, or clean a sheet of glass to act as a substrate for the collodion emulsion. 3) Pour the salted collodion onto the plate to cover it evenly with the emulsion, and drain the excess back into the pouring vessel. The collodion film will begin to set as the solvents evaporate from the surface. It is important to let the collodion set and form a “skin” for approximately 15-30 seconds before proceeding to the sensitization step. If the plate is placed in the sensitizing bath too soon, the collodion film will partially dissolve and be ruined. This will also contaminate and adversely affect the sensitizing bath. On the other hand, if the plate is withheld too long, the film will become impervious to further chemical action and will not sensitize or develop properly. The following two steps are done under deep amber or red safelight illumination: 4) Immerse the plate into the silver nitrate sensitizing bath. Most sensitizing baths are housed in a lightproof box to enable the photographer to safely leave the darkroom once the plate is submerged in the tank. The plate needs to sensitize between 3-5 minutes on average. Sensitizing is sufficient when the silver nitrate flows off the surface of the plate uniformly without beading or forming irregular rivulets. Upon sufficient sensitization, the originally transparent collodion film will take on an opaque creamy appearance. 5) The sensitized plate is removed from the silver bath, the reverse carefully wiped to remove excess fluid, and then it is placed in a special lightproof wetplate holder (Figure 3). Note that the plate is placed in the holder and exposed while it is wet (hence the name “wetplate” collodion). The photographer usually has a 5-10 minute window from the time the plate is removed from the sensitizing bath through camera exposure and darkroom development before the emulsion solvents (ether and grain alcohol) evaporate and the collodion film becomes impervious to the processing solutions. This timeframe varies with heat and humidity as well as the particular collodion formula used. 6) The plate holder is brought to the camera which has been previously set-up in regard to framing and focusing on the subject. The subject should be illuminated by UV rich sources (e.g., northern skylight, sunlight, fluorescent lamps, etc.). The sensitivity of the plate will extend from UV through blue wavelengths. The spectral sensitivity may be extended slightly through the use of various halogen salts in the collodion formulas.
8) The plate holder is returned to the darkroom for processing. The following steps again require deep amber or red safelight illumination: 9) The exposed plate is removed from the holder and is either transferred to a development tray, or, more commonly, the plate is held horizontally in one’s hand. 10) A minimum volume of developer solution (see ferrous sulfate formulas) is poured over the plate and development is timed to about 15 seconds for positives, or 90 seconds for glass negatives. (Exposure of subsequent plates is adjusted to bring the plate development times into these ranges.) 11) Water is flowed over the developed plate until all traces of developer have been removed. This may be done by rinsing the plate in hand or in a tray with several changes of water until the water flows off the plate uniformly without forming rivulets or streaks on the collodion surface. It is now safe to bring the plate into normal lighting conditions. 12) The plate is fixed for twice the time it takes to clear in a solution of either sodium (hypo) or ammonium thiosulfate (rapid fixer), or a weak solution of potassium cyanide (KCN).
13) The plate is washed in several gentle changes of water over a period of several minutes to remove the fixer. 14) The plate is dried either passively in a drying rack or slowly over the gentle heat of a paraffin lamp. 15) A protective varnish is poured over the dried plate, the excess drained, and the varnish solvent evaporated by slowly heating the plate evenly over a paraffin lamp. 16) Finished plates are generally sealed under glass in protective frames or cases. Ambrotypes on transparent glass will need to be backed with a dark material in order to produce the characteristic optical reversal to a positive image.
Though modern view cameras can be retrofitted with special wetplate backs and plate holders, it is also possible to adapt dryplate holders or modern sheet film holders for use with the process (Figure 4). The latter will work to get one started using the process without investing a great deal of money on wetplate camera equipment.
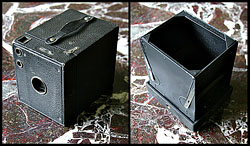
Inexpensive antique Brownie box cameras and modern Holga “toy cameras” may also be used with surprising results. The Brownie cameras exhibit remarkable sharpness and picture quality. Modifying a Brownie camera is very simple (Figure 5). Note that only metal plates can be used in these simple cameras. Glass plates are too thick and prevent the camera backs from closing correctly.
For the sensitizing and fixing steps, most wetplaters use specially constructed tanks instead of darkroom trays (although the latter may be employed). These tanks are fairly easy to construct from acrylic sheet. The silver sensitizing tank is usually housed in an inclined lightproof box or outer shell to prevent exposure of the plate. A “dipper” made from acrylic is also used to lower and raise the coated plates into these baths (Figure 6). For reenactors concerned with period correctness, glass tanks are usually employed instead of modern plastics.
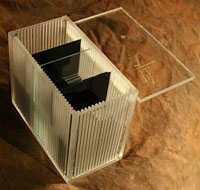
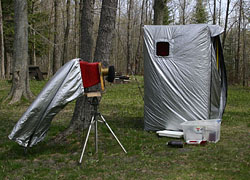
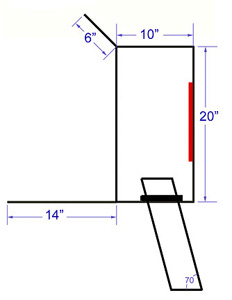
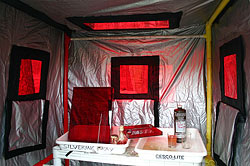
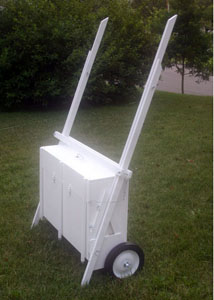
Specially constructed plate boxes and drying racks are useful items to have on hand. Plate boxes may be fabricated from both wood and acrylic (Figure 8). The acrylic ones double as a wash tank and are useful for transporting wet plates home from the field for further processing when time or resources in the field are restrictive. Conventional black plastic darkroom papersafes may also be used to transport large wet plates home. The papersafes are stackable and hold sufficient solution to prevent the plates from dessicating and becoming impervious to further processing. Other workers construct special trays for “glycerizing” plates in the field to prevent dessication. Information on that process can be found in most texts devoted to wetplate work. Drying racks turn up in flea markets and antique shops at reasonable prices or they may be purchased new from a couple of wetplate camera sources. Though I haven’t tried them, I imagine commom kitchen dish racks of similar design could be used for drying photographic plates. Speaking of kitchen stuff, obtain a 3-minute egg timer for monitoring plate sensitization. A hydrometer is used to measure the specific gravity of the silver sensitizing bath in order to keep it replenished correctly. As plates are run through the tank, silver is combined with the iodide and bromide salts in the collodion film. This reaction causes the silver bath to weaken in strength thus requiring replenishment. The hydrometer helps bring the solution back to proper strength. Due to the constant release of ether and alcohol as well as salts coming off submerged plates into the silver solution, the specific gravity changes due to these contaminants. The bath will never be as pure as it was initially, but the hydrometer at least provides some useful feedback. Expensive lab hydrometers are not needed and may actually complicate the measurement process. Hydrometers of sufficient accuracy may be purchased at aquarium supply shops as well as stores that sell brewery supplies. Finally, a portable darkroom is needed for most location work. Lightproof tents are one option, but they tend to be expensive to commission and bulky to use with an investment in time to set up (Figures 9 & 10). On the other hand, those with carpentry skills and a few tools will find construction of a collodion darkbox an easy weekend project. Designs vary and include the plans found in John Coffer’s Doer’s Guide for period darkboxes, manufactured designs available from the Star Camera Company, and individualized darkboxes such as the one I constructed. My darkbox is a Transformer-like thing on wheels incorporating a sensitizing tank dropped through the base of the box to allow large 10”x12” plates to be sensitized within the small suitcase-sized enclosure (Figures 11, 12, & 13).
|
||||||||||||||||||||||||||||||||||||||||||||||||||||||||||||||||||||||||||||||||||||||||||||||||||||||||||||||||||||||||||||||||||||||||||||||||||||||||||||||||||||||||||||||||||||||||||||||||||||||||||||||||||||||||||||||||||||||||||||||||||||||||||||||||||||||||||||||||||||||||||||||||||||||||||||||||||||||


|
|
|
|