 |
|||
|
|
|
Altering a Negative’s Personality: by Steve Sherman Simply stated, forms of minimal agitation film processing, including stand, semi-stand and extreme minimal agitation, allow a unique and powerful means of affecting mid-tone contrast. The “personality” of your negative is more in control than ever before in the wet processing of black and white films. Reduced agitation (RA) processing techniques have gained a certain notoriety both in a positive context, by many who were successful, and in a negative context by some who deny the validity of the techniques. There are dozens of ways to process film, but I continue to use this type of film processing for one singular reason. The silver gelatin process has the single most contracted tonal scale of all wet processes. Mid-tones especially tend to be compressed with conventional film processing techniques, especially when the sun is above the horizon. Increasing the film’s mid-tone separation by way of an organic technique produces a superior result, in my opinion, based on 40 years of experience. My belief is that very dark & very light values are merely relationship points, whereas the soul of a B&W photograph lives in the mid-tones. Therefore, my entire focus is on creating options for greater mid-tone separation, both in film processing and silver printing. The RA technique affords me that luxury. Time and inconvenience fall far down on my list of priorities. I will begin the article by way of a few critical bullet points. How reduced agitation terminology came into existence will be discussed later in the text.
Establishing a benchmark and historical reference to my discovery of a workable RA method in 2003 is vital to fully appreciate the origin and potential of adjacency effects. They are real and have been known about for more than a century. In a recently released video on my Minimal Agitation process, I mentioned I’d never heard the term Mackie Line, except for a reference from an Edward Weston book I’d read. In the extensive research I have done for this article, the very first mention of “Stand Development” I found was described by Wratten and Wainwright1 in 1882. Their quote, “unless the developer be occasionally agitated there is considerable risk of peculiar local markings and stains.” The genesis of the term “Mackie line” begins with an interesting anecdote2: In 1885 a man named Alexander Mackie rose at a meeting of the London and Provincial Photographic Association in 1885, as colleagues advanced theories about lines that sometimes appear around a figure or shape in a photograph, a bit like halos. "No, no, sir!" he cried. "That simply won't do. That doesn't fully explain it at all." For each theory brought forward to explain the mysterious lines, Mackie disproved it with a counter example. He showed pictures, he demonstrated his theses with objects, vases and tables. Optical illusions, effects of radiation, disparity between central and marginal rays of a lens, exhausted developer, nothing withstood his intellectual rigor. When the matter was revisited in subsequent meetings Mackie was always there. He haunted these meetings and garnered a reputation: the guy with the lines nobody can explain. After thirty years of this—thirty years!—Mackie could take no more, and wrote a letter to the august British Journal of Photography (64, 11-12, 1917) saying (in effect), "Hey, everyone associates these lines with my name as if the matter were settled, but that's far from the truth. We still haven't a clue." In The Theory of Photographic Process (1942), author C.E. Kenneth Mees described Mackie lines as “the commonest adjacency effect”3. Mees writes “The fringe effect appears in general photography in what is known as the Mackie line4; that is, a sharp decrease of density that occurs just outside a dense portion of the image. All these local effects, which in extreme cases can produce large stream-like markings upon the developed image, are minimized by effective stirring of the developer over the surface of the material” (page 880). Edward Weston knew of this film development trait and used it to great effect in some of his well-known images.
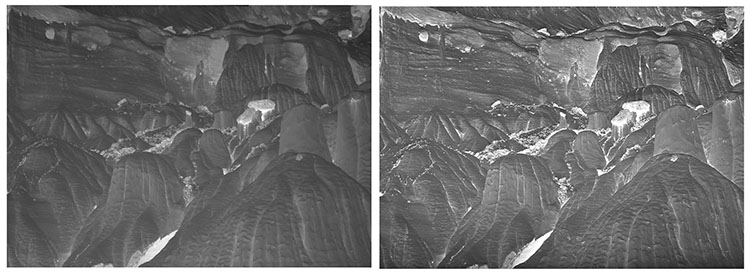
Further research yielded a story about the French photographer, Eugene Atget, who would excuse himself from evening dinners to agitate film every half hour or so. Mortensen, Atget and Edward Weston may not have understood the why of the process, but they clearly understood the power of extremely dilute developers and extended processing times. When developer is allowed to exhaust in certain areas while continuing to be active in less exposed areas, a very delicate balance is achieved. The result is what is commonly known as adjacency effects. What happens, the benefits of what happens, and exactly why will be explained later. B&W films have evolved over time, due in large part to manufacturing improvements, naturally always targeted at greater efficiency and profits. Films from long ago are referred to as “thick emulsion” films. This design suspended silver halides in a thicker emulsion than modern day films, which contained more coarse-grained silver halides. The larger grain was of little consequence until small roll film cameras became popular. Because of the thick emulsion, it took developer longer to “seep” into and thereby “swell” the delicate emulsion. It is my belief that serious photographers learned how to exploit thick emulsions for a superior result. Several understood that extending development times and reducing agitation could produce extraordinary tonal gradation. I have found it difficult to determine exactly when “thin emulsion films” came into the mainstream. Nevertheless, the growing popularity of photography gave birth to modern thin emulsion B&W films. These thin emulsions were more consistent, easier to manufacture, and most of all sharper; they were ideal for smaller cameras using roll film. Naturally, this led to greater interest by the masses and translated to increased profits for the manufacturers. Whether film emulsions be thick or thin, my belief is that photographs originating from film will always exhibit a perception of depth and roundness superior to that of a digital flat sensor relying on computer algorithms to produce monochrome tonalities—a spirited discussion for another time. Esteemed Kodak engineer and emulsion expert Rowland Mowery offers the following observation: “Developers can be maximized for any two of the following: grain, sharpness and speed. Normally, you cannot maximize all three but you can strike a happy medium.” I discovered a near perfect combination in a tanning developer such as PyroCat HD, a medium speed film similar to Ilford’s FP 4, and the reduced agitation (RA) processing technique which I will outline below. Mowery’s three factors converge at an optimum point. Medium speed films with PyroCat produce fine grain, which is further enhanced by the staining characteristics of a pyro developer. Consider also the significant benefits of RA processing: box speed can be expected with most films, highlight densities are compressed, while mid-tone contrast and separation is maximized. For the silver printer there is no more powerful trifecta! The Evolution of My Discovery The basic premise of my success is best expressed in the age-old adage “expose for shadows and develop for highlights.” That phrase provides the very basis of the Zone System; it is the DNA of how B&W films should respond to exposure and development. Most importantly, the relationship between exposure and development offers the means to significantly manipulate film for a creative final rendering, not only in silver printing, but all alternative processes born from film! I began using PMK Pyro developer in the late 1990s; this provided an overnight improvement in my negatives, particularly in the highlight region, both in density management and tonal separation. Several years later I acquired a 7x17” panoramic camera. This size camera yields negatives where “contact” printing is the accepted norm. I was impressed with the tonalities of Azo, which is a predominately chloride-emulsion paper used in contact printing and is less sensitive to light than enlarging papers. For years I had been enlarging my negatives with faster bromide-emulsion papers. On the Azo forum I began to research what others were using to process negatives designed for contact printing. Increasing my negative contrast for the longer-scaled Azo paper seemed easy, but would prove quite frustrating. I could expand negative densities through extended film development, but I was not satisfied with the “separation” of tonalities, which was nothing like what I had become accustomed to with the higher contrast of bromide-based enlarging paper. Suggestions from the Azo forum to increase the contrast index of my negatives continued to yield disappointing results, despite trying Pyrocat HD, PMK and the very aggressive ABC Pyro formulas. Michael A. Smith was a proponent of ABC Pyro, a formulation that Edward Weston used. I knew Michael and Paula and respected their work, however, there was one glaring difference between their work and mine: their negatives were made during significantly higher contrast lighting conditions, often at mid-day. Rarely do I expose film when the sun is high in the sky; I simply don’t care for the general compression of mid-tone separation. This was my line in the sand! So, to move forward with Azo something had to change in my negative design and/or processing. But compression in the mid-tones is not a concern with the RA method of film processing, even with mid-day lighting conditions! This opens up significantly more time in the day to make images. Early in 2003, after more than a year of experimenting, I was ready to abandon Azo when I came across an article on Unblinking Eye entitled An Introduction to Pyro Staining Developers, by Sandy King, detailing various Pyro and staining developers. Towards the end of that article he described a technique called “Stand or Semi-Stand” development. Mr. King noted in his article that while the semi-stand technique was “fraught with dangers,” when the process worked negatives of “extraordinary sharpness and adjacency effects” were common. I was intrigued, up for the challenge, and decided to give it a try. I experimented with Pyrocat HD, which is a two-part (A & B) pyrocatechin-based developer. A & B are mixed together from stock solutions immediately before use. After an initial agitation of two minutes, the film “stands” in a vertical orientation for a long period of time (dependent on exposure). A second, shorter agitation at the halfway point reintroduces fresh developer, the film returns to a vertical orientation for the remaining amount of development time. This technique is possible with varying agitation intervals and many different developers. Because of the dramatic increase in development time, I began with a very high dilution of 1-1-500 (1-1-100 is normal). In my first few tests sharpness was unlike anything I had ever seen before; however, negative density needed to be greatly increased. As with any photographic process, personal testing would eventually yield the most consistent wisdom-based results. Development artifacts, such as areas of uneven density and streaking in higher density areas were readily apparent in those first few test negatives. The streaking is commonly referred to as “bromide drag,” caused by extremely dilute developer bromides released in heavier exposed areas without the benefit of reintroducing fresh developer by way of “frequent” agitation. I continued to experiment, making only one change at a time. I wanted to stay with a one-hour development time, or less, so I gradually increased the concentration of the PyroCat HD. There were many problems in those early tests, and if not for the intoxicating look of that first negative I might have given up. I continued increasing developer strength, finally arriving at a dilution of 1-1-175. Highlight densities for silver-based contact printing were now in reach. Remaining slight uneven densities in areas of higher exposure were soon eradicated by modifications of the initial agitation technique. I found that initial agitation must be vigorous for at least the first 1.5 to 2 minutes. That simple change has solved uneven development problems for virtually every photographer to whom I have taught this technique. Early in the testing process I learned that RA did not work in a tray. It may have been because the negative floated to the surface in the dark, but in any case I never tried horizontal tray processing a second time. To this day, all my film is vertically oriented, processed one negative at a time in three-inch tubes of my own design. More on those tubes later. A note of caution, particularly with the semi-stand agitation method of only one mid-point agitation: 1-1-200 dilution runs a high risk of areas of uneven development, and lower density at the bottom of the vertical tank. This again is due to a buildup of bromide reducing developer activity. Why Pyro is Important to the Reduced Agitation Technique I consider any pyro-based developer superior to all other film developers for a variety of reasons—born out of 40 years experience with film processing and silver print making. Pyro is integral to my success with the RA technique and extended development times. While reduced agitation processing works in principle with many different developers, tanning developers, such as all formulations of pyro developers, are best. Pyro negates the adverse effects of silver migration found in developers containing the preservative sodium sulfite. The tanning effect hardens the emulsion in the first minutes of development. Thereafter, silver migration, the degradation of the edges of silver halides, is halted—this alone produces a sharper negative. To quote from H. Lynn Jones5, Professor of Photography at ACC in Austin, Texas, “a tanning developer yields a relief image of such proportions in thick emulsion films, that it can be used to transfer inks or dyes.” If you hold a modern day pyro-processed negative up to “glancing” light; you will see varying degrees of relief. This relief is a product of exposure density and the tanning effects derived from Pyro formulations. By itself, this effect leads to superior tonal separation. Because the relief is organic in nature, the transitions appears smoother in fine detail. The major difference between PyroCat and PMK is the respective reducing agents: pyrocatechin versus pyrogallol. The pyrocatechin formula operates at a higher pH, compensates more, and is less prone to oxidation and unpredictabe results. The RA technique demands that the negative spend extended periods of time in the developing solution, but the extended developing time provides greater repeatability and is more compensating in nature. That is not to say PMK could not be harnessed for the RA technique, it simply is not my developer of choice, based on the strengths of the PyroCat formulation when used with extended film processing times and multi-contrast papers. The aforementioned Introduction to Pyro Staining Developers by Sandy King really breaks down the strengths of the various Pyro based developers. The Beginning Negatives On a 2003 trip to the Utah wilderness I encountered an extraordinary area of erosion, with mostly high key tonalities, in overcast soft lighting conditions. I decided I would expose two sheets identically of all my 7x17 compositions, allowing me to experiment with varying forms of development upon my return home, in the hopes of printing with Azo. First, I would get a printable negative with conventional tray processing in ABC Pyro, considered to be one of the most aggressive Pyro formulations. I processed the second identically exposed negative using PyroCat HD and a “semi-stand” technique seen on the right in the illustration below. The difference with semi-stand processing is clear and undeniable. Conventional wisdom suggests that a negative with a highlight density of 1.53 above film base plus fog, as in photo # 1, would be higher in contrast than one of 1.36 density, as in photo #2. But the lower negative density on the right shows greater mid-tone contrast and clearly illustrates that the straight line of the film has been significantly altered, creating greater mid-tone separation.
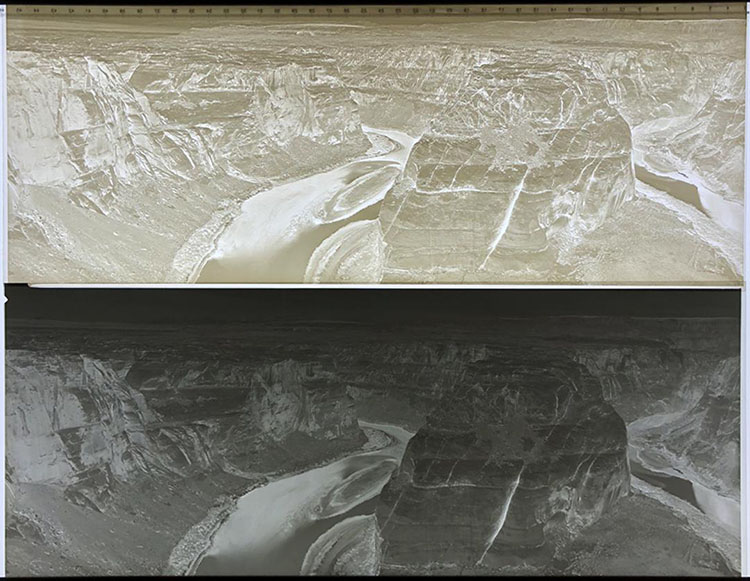
In a 2004 trip to the Southwest I made the 7x17” identically exposed negatives seen below. My hope in choosing the very aggressive ABC Pyro formula was to create the needed contrast for my preference to expose film during soft lighting conditions. This 2nd side-by-side comparison of tray agitation versus the semi-stand technique left me with no doubt that reduced agitation and PyroCat HD would yield the negatives I was searching for.
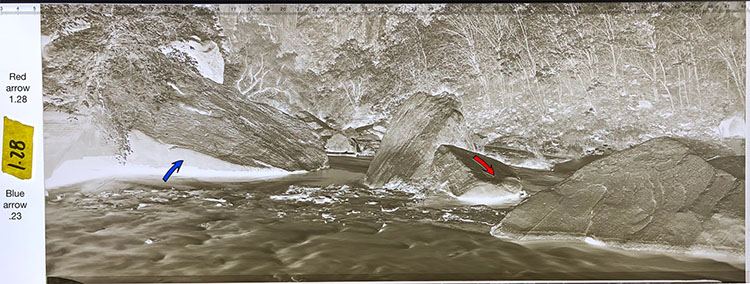
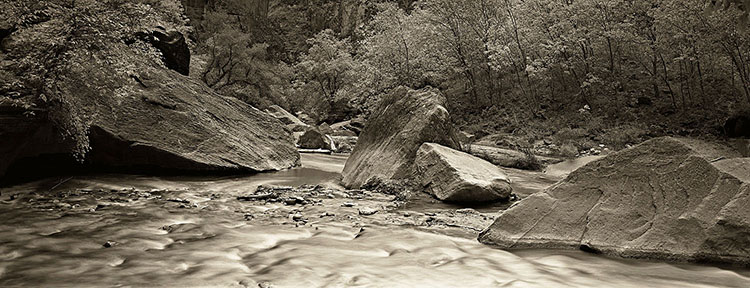
By the time I made a return springtime trip to Zion National Park in 2005 I was fully committed to the RA technique for processing all my film. I was still employing the Adams’s Zone System of exposure. The negative below, of the Virgin River, was designed using traditional Zone System methodology of exposure and development; in other words, the contrast range of the final print was built into the negative. I measured the shadowed area of the rock on the left and calculated it would fall on Zone 2 (blue arrow in the negative, with a density of .23). I then measured the light on top of the rock on the right and calculated it would fall on Zone 8 (red arrow in the negative, with a density of 1.28). I chose a Zone 2 placement for the shadow area because I intended to print on Kodak Azo silver chloride paper, which is known for better separation than traditional silver bromide papers, particularly in the low values. Based on traditional Zone System wisdom, this is as close to a perfect negative as possible. By now the only film processing technique I had used since 2003 was either semi-stand or extreme minimal agitation (specific terminology will be explained later).
Chemical processing of any film using the reduced agitation technique can and will significantly increase the slope of a film’s characteristic curve. Please don’t confuse plus or minus development with traditional continuous agitation as a means to significantly alter a film’s curve. Plus or minus film development simply moves tonalities up or down the same characteristic straight-line of any given film. It is the slope of the characteristic straight-line that affects mid-tone contrast and separation.
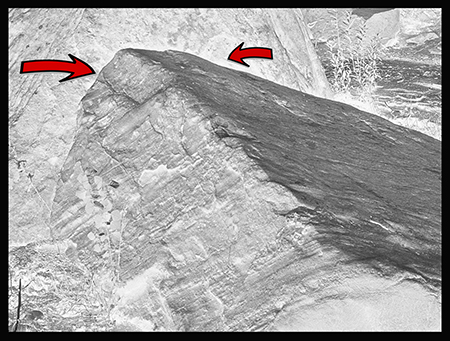
I had become friendly with Michael A. Smith during all our interaction on the AZO Forum and I reached out to him to look at some of my recent images made with reduced agitation. I visited Michael and still remember his stunned look when he saw the Virgin River negative; he called to his wife Paula “come see what Steve has brought to show.” Michael and Paula offered a quote about my semi-stand processed negatives I showed that day in 2006: When we saw the prints that resulted from negatives that were developed with semi-stand development and compared them with negatives that were conventionally developed, the differences were astounding. Steve Sherman's work in this regard challenges our assumptions of what it means when something is called “photographic.” (Michael Smith & Paula Chamlee, ultra large format photographers and authors.) To be completely clear, Michael’s quote does validate that the differences in processing technique is considerable, however, he went on to clarify that his comments were more a criticism than an endorsement. His direct quote after viewing the Azo print was, “the print looks fractured.” When comparing his prints made from Kodak’s XX film, the last of the thick emulsion films and known to be less sharp, developed in ABC Pyro, which yelds a coarser grain structure than PyroCat HD, the differences between his prints and my Azo print, seen above, was startling; I am not surprised he had a negative take away. Below is an exploded view of an area where the higher density rock borders the lower density background. There is a clear “line” of density that follows along the area of dissimilar tonalities between the rock and background. This is what was commonly referred to a century ago as a Mackie line. When those types of relationships happen throughout the negative and can be controlled, the result is a game changer in the mundane act of processing film.
Since 2004 all my film has been processed via the RA technique, and I have concluded the following:
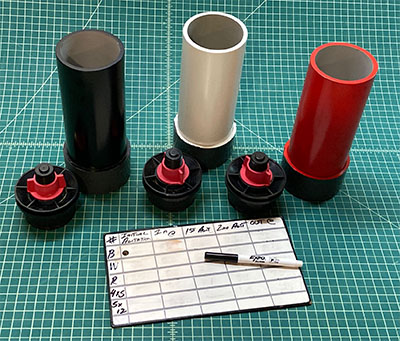
The vessels I have used for the RA process in a vertical orientation have gone through many redesigns.
How & Why Reduced Agitation Works Dilution allows Extended Time, allowing Infrequent Agitation, which allows Developer Exhaustion at the boundaries of differing densities, which produces Adjacency Effects, which give the impression of higher Acutance and greater Mid-tone Contrast & Separation. Each of these four variables is intrinsically tied together playing off one another in a very delicate set of relationships, capable of producing adjacency effects beyond what is photographically acceptable. Because of these delicate relationships, many dispute RAs legitimacy, born out of failure rather than experience and wisdom.
Problems, Solutions, and Adjustments My premium video on Reduced Agitation has been purchased by over 100 film photographers, from that, I have learned a variety of mistakes and assumptions photographers have tried and failed with. Here are many in Bullet Point form:
Never change temperature!! there are enough variables with this process, eliminate this one Never change temperature!! there are enough variables with this process, eliminate this one
Personally, I am committed to the specific highlight densities mentioned earlier, i.e. above film base + fog for my silver prints. I accomplish these densities through the old fashion method, using the Zone System N+ or N- development method. It is simply the concept by which I have processed film for nearly 40 years, and since 2003 by way of the extreme minimal agitation (EMA) technique. However, I wrote another article for Unblinking Eye about my Separation System showing virtually identical prints from a wide range of highlight densities. This flexibility is a direct result of appropriately exposed negatives, multi-contrast papers and the split-grade printing technique. Roll film users, employing my general negative design using the RA technique of processing film, now also have options in silver printing never before available to them. Choosing to alter any of my tested RA techniques will demand a committed effort to perfect in any photographer’s workflow; if you have interest, I will provide email support throughout the learning curve here: steve@steve-sherman.com. The following two quotes best summarize the RA technique. Good friend Tim Jones, and the very first large format photographer I shared my discovery with in 2003 offered # 1. There are five components to my Power of Process approach. Each is targeted at creating greater separation of tonalities. There are two more articles on this site describing other parts of my separation techniques. Please consider reading them, as all these techniques are tied to a singular approach to creative black and white photography. The Reduced Agitation Premium video may be reached via this URL: https://gumroad.com/stevesherman#VWfNx with a 50% discount when using the discount code unblinkingeye at checkout
For those interested in pursuing my Power of Process technique there are several options: ONE on ONE workshops are available for daily or weekly rates: inquire via email below
Other Articles by Steve Sherman: email: steve@steve-sherman.com |
||||||||||||||||||||||||||||||||||||||||||||||||||||||||||||||||||||||||||||||||||||||||||||||||||||||||||||||||||||||||||||
|
|
|
|
