 |
||||||||
|
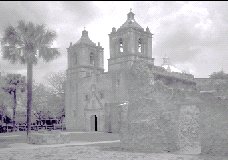
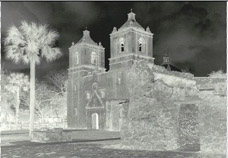
Making Digital Negatives for Van Dyke Browns by Introduction Inkjet printer technology has improved significantly in the past few years - it is now up to the task of creating large format negatives for contact printing. Dan Burkholder's Making Digital Negatives for Contact Printing is the sine qua non on the subject. Burkholder's inkjet discussion, though thorough, is a bit dated. New materials are available that allow you to print maximum resolution images without ink puddling - spectral density negatives are no longer required. All digital negatives require the application of adjustment curves that fit them to the needs of specific alternative photographic processes. Burkholder recommends, and provides adjustment curves for, the positive version of the image. I find this approach a bit counterintuitive and recommend applying curves to the negative instead. Here's why. Adjustment curves applied to the positive form of an image produce decidedly weird results. In the following figures, the image on the left is ready to print on the inkjet. The image on the right shows how the image looks with a Van Dyke curve applied.
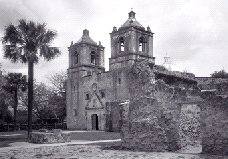
By contrast, working directly with the negative allows you to see and appreciate how changes to the curve affect the Van Dyke Brown print. In the following figures, the negative on the left is the straight negative. The negative on the right has been adjusted for Van Dyke Browns. Applying the curve opens up the sky and improves highlight detail.
One final point: everything stated in this article assumes that you have calibrated your monitor and your printer so that what you see is truly what you get. The calibration process is automatic for most Mac users, but is anything but automatic for PC users. Some notes on calibration briefly explains the process for PC users. Overview of the Digital Negative Making Process Step 1 - Create a Perfect Inkjet Print of the Image Since you're going to be printing your negative(s) on your inkjet you should start by making the best print you can on that inkjet. Hint: during the first few iterations, make small prints. Make a final full-sized print to verify the final form of the image. Step 2 - Create a Negative Version of the Image Make a "Merged Copy" of the image (the merged copy gathers all your adjustments, layers, etc into a single corrected copy). Paste the merged copy into another layer and Invert this layer (Image > Adjust > Invert). You now have a working negative. Step 3 - Apply a Van Dyke Brown Correction Curve to the Negative The response/behavior of any alt process print is different than that of your inkjet printer. To correct for the differences, you apply an adjustment curve to the image. Step 4 - Print the Negative on Pictorico OHP Transparency Material Flip the negative image horizontally (Image > Rotate Canvas > Flip Horizontal) and print using RGB mode on Pictorico OHP transparency. If you can add the image flipping to your custom printer mode, so much the better. Step 5 - Make a Van Dyke Brown Print from the Inkjet Transparency Using the direct sun for a light source, most of my negatives produce a good Van Dyke Brown image in 3 to 7 minutes. But, I seem to get better and more consistent results using the light from the north sky. North sky prints take 15 to 30 minutes exposure. Step 6 - Go Back to the Van Dyke Brown Correction Curve, Adjust, and Try Again | ||||||||