|
Calibration
Every aspect of creating digital negatives is
complicated and made more difficult if your screen and
printer aren't calibrated. Effort spent calibrating is well
worth it.
Calibrate Your Monitor
Calibrate your monitor using the Adobe Gamma
Utility.
Obey the wizard in all things except one - you
do not need to start by setting your monitor's
brightness control to the max. The gamma utility will
adjust grey values to whatever brightness setting you
choose. As long as white looks white and black looks black
the brightness is adequate. If you've already been through
this process, ignore me.
Disable Automatic Color Correction
Agents
Both your image editing software and your printer
management software have features that are designed to
ensure that you get acceptable images most of the time.
These largely undocumented features are installed and
activated by default. Unfortunately, these features also
work together to prevent you from making good digital
negatives!
For digital negative-making using Photoshop you
will want to change several settings in the
File >
Color Settings menu.
RGB Setup
- Change sRGB to Monitor RGB
- If you are using Microsoft Windows products,
change the Gamma setting to 2.20.
- Leave the White Point setting unchanged. The
Adobe Gamma Utility sets this value which contains the
results of your monitor calibration efforts.
- Ensure that the Display Using Monitor
Compensation checkbox is checked.
CMYK Setup
These settings are probably ok as is. In most
cases the Dot Gain figure should remain set at 20%.
Grayscale Setup
Change the Grayscale Behavior setting to RGB. This
greatly increases the inkload the printer will deliver and
its effective resolution.
Profile Setup
Disabling everything in this dialog box prevents
Photoshop from changing things "for your own good."
Final Check
Run the Adobe Gamma Utility one more time "just to
be sure."
Calibrating Your Printer
The simplest way to calibrate an Epson printer is
to create and save a "Custom Mode" for the printer and use
it whenever you print. You'll probably have to pick this
mode every time you do any serious printing since by
default the printer driver will operate the printer in
"Automatic Mode." I have made several Custom Modes, some
for color printing and one for alt process negatives.
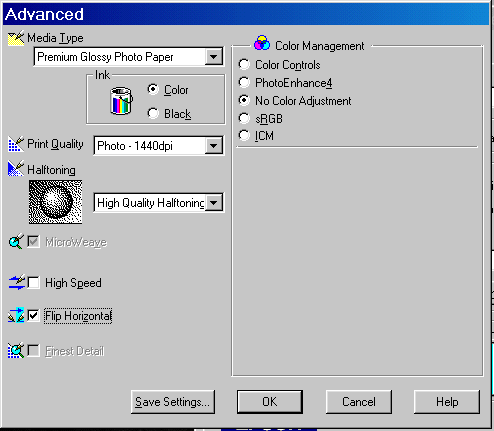
Typical Black and White Custom Mode
My settings are shown in the following figure.

In general:
- Turn off Color Management controls - the
precise color balance of your negatives is relatively
unimportant.
- You won't have a setting for Pictorico OHP
film, so choose Premium Glossy Photo Paper for the Media
Type. If you are using another transparency material use
the setting recommended by the paper manufacturer.
- Set the Print Quality to the highest setting
available (for my printer it is 1440 dpi).
- Set the Halftoning setting to High Quality
Halftoning.
- Uncheck the High Speed check box.
- Click the Flip Horizontal checkbox if you
don't want to have to flip your images before printing.
Back to Overview
|