|
Creating Digital Negatives
The following instructions describe the way I
build a digital negative for Van Dyke Browns. Aside from
creating a useful digital negative, the organization of my
file and the sequence of steps I take to produce it are
intended to provide some additional benefits.
- The file records more of the image's history
than the history palette does.
- The file structure permit backups and restores
to any point in the image's evolution.
Structure of a Van Dyke Brown Digital
Negative
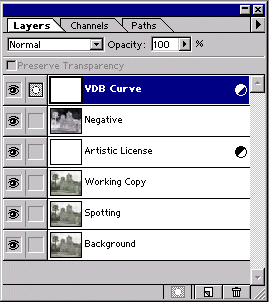
The following figure shows the Layer palette for a
typical Van Dyke Brown negative.

First Layer
By default Photoshop layers are added on top of
one another. The layer stack grows from the bottom up, and
the first layer is usually called the Background
layer. The original scan of the image should be put on, or
directly above the Background layer.
Level Set
Levels are best set at the scanner. My scanner
software does not permit this, so the first thing I do is
set the white point and the black point of the image not
the 5% and 95% point Dan talks about in his book. This
initial setting is just for the computer's sake. It ensures
that the internal arithmetic representation of the tones
use all the numbers that are available. Don't worry about
how the image looks at this point and DO NOT use the
automatic level set for this purpose.
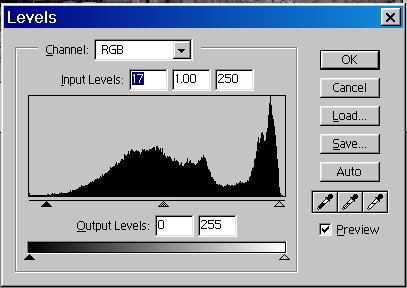
The following image shows the level setting for
the example image.

Note that the sliders are set at the edges of the
curve. If either slider is set outside the limits of the
curve, some of the computer's tonal values will be assigned
to tones that do not exist. The remaining tones must then
share what is left over.
Spotting (copy of first layer)
To preserve the initial state of the scan, copy
the bottom image layer and paste it into a new one. Name it
Retouching and use it for spotting out dust and
scratches.
Working Copy
If you will need curves, masks or other
alterations to get a good inkjet print, copy the Retouching
layer and paste it into a third image layer. Work your
creative magic on this layer - that way you cannot harm
your carefully retouched original scan. The layer above
(Artistic Liscense) indicates the location of additional
layers used in creating the final image.
Print the finished image on photo quality glossy
paper using the same printer you will use to make the
digital negative. Adjust and repeat until satisfied.
Negative
Once you've got a good inkjet print you know that
you can print a negative that will produce the desired
results. Make a merged copy (Select > All - Edit
> Copy Merged) of all the layers and paste it into the
picture. Name the new layer negative.
Invert (Image > Adjust > Invert) this layer.
This layer is your working negative. Hide all the other
layers if you like.
Van Dyke Brown Curve
Load the Van Dyke Brown curve into a new
Adjustment layer above the Negative layer. Name this layer
so that you know it is the Van Dyke Brown curve.
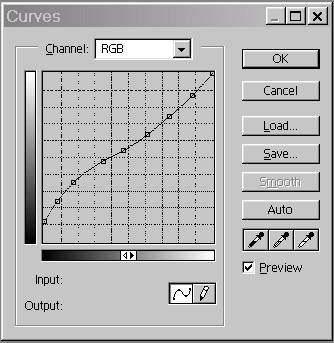
The following figure shows the Van Dyke Brown
curve I used to print the sample image.

The data points (represented as small squares on
the curve) are included here.
| Input |
Output |
| 225 |
222 |
| 190 |
190 |
| 156 |
162 |
| 120 |
138 |
| 90 |
121 |
| 44 |
90 |
| 20 |
61 |
| 0 |
24 |
Printing the Negative
Flip the Image horizontally if you have not
included this setting in a custom printing mode you have
created for digital negatives. The ink pad in most overhead
transparency materials disperse light somewhat and slightly
blur the image if you try to print through them.
Print the image on Pictorico OHP using the Custom
Printer settings you saved when you calibrated your
printer.
Making the Van Dyke Brown Print
Use the digital negative as you would any negative
to expose the sensitized Van Dyke Brown paper. If you are
unhappy with the contrast or want to make other
adjustments, adjust the correction curve on the
negative layer, reprint the digital negative and
then make another Van Dyke Brown.
|