|
The Texas Revolution in Gold:
The Chrysotype Reinvented
by Richard Eugene Puckett
Introduction
The Texas chrysotype process offers the printer a simple and repeatable way to make gold prints of extraordinary beauty. You need only add a few drops of ascorbate to 40% ammonium ferric
oxalate (AFO), mix with an equal volume of 10% gold, and brush the solution onto a sheet of suitable paper. You expose the coated paper to UV light and examine the progress of the image,
choosing the exact moment to stop further printing out. Identical prints can be made quickly and effortlessly.
Texas chrysotypes are true continuous-tone images. They exhibit a range of at least 10 stops and are virtually grainless. In the following test strip, printed on off-white Arches Platine paper, ten
steps from base black to white are delineated. Note that in the digital reproduction steps 2 and 9 are considerably more difficult to distinguish from 1 and 10, respectively, than in the original:
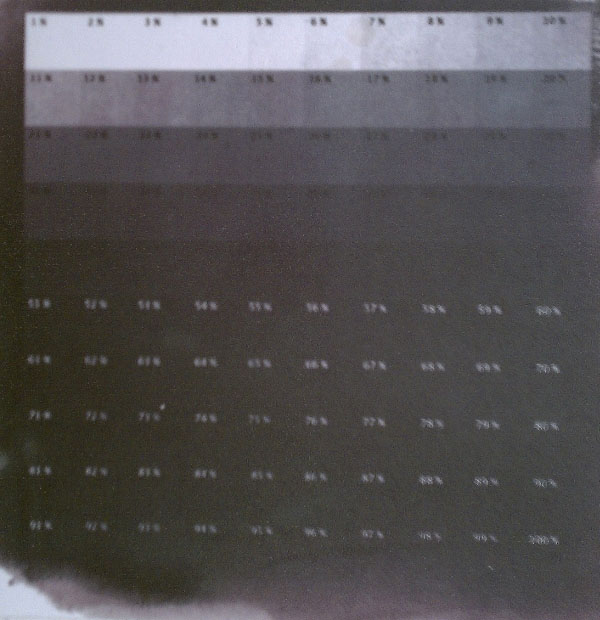
The following 100 step transmission wedge provides a different perspective on the Texas chrysotype scale. The first clear distinction above the base black occurs at 49%. Detail is just
visible at 42%. The final step with any detail (a few small dots, not visible in scan) occurs at 4%.
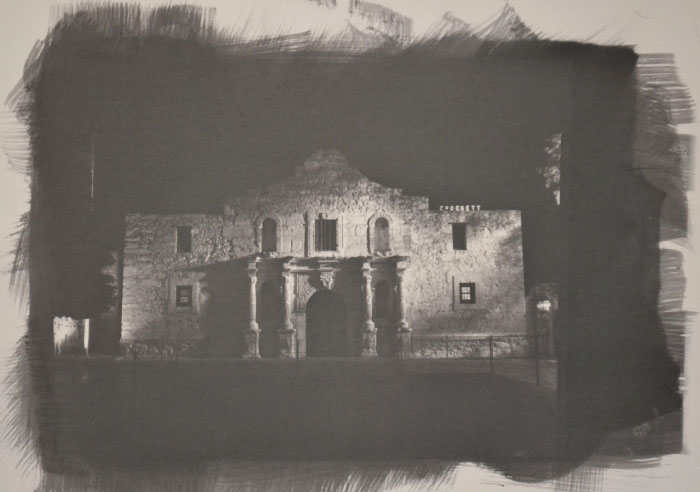
The range shown in the above charts is well represented in the following print of the Alamo at night. This image exhibits a full range of steps from the empty black of the night sky through the
various grays on to the direct light sources of the lamp in front of the Alamo and the neon sign "Crockett" peering over the right edge of the facade. With no dodging and burning, the gold image
takes full advantage of the off-white Arches Platine on which it is printed. The limiting factor to the tonal scale is the paper itself rather than the process.
Key to the Texas Chrysotype: Ascorbate
The critical limitation of printing with gold is its inherent contrast. After his experiments in 1842, Herschel declared gold an unsuitable medium for continuous tone images. Even recent
developments in printing with gold have failed fully to tame gold's contrast. The Texas chrysotype process overcomes this limitation through what amounts to the chemical introduction of base fog.
With only two compounds needed to print a crude chrysotype -- light-sensitive AFO and inert gold chloride -- it is obvious even to the non-chemist which of the two must be modified. However,
until now, no one has been able to discern how AFO must be altered. The key lies in a limitation of AFO itself: the compound's gradual decay from ferric iron to ferrous iron. As a solution of 40%
AFO ages, prints made with it lose contrast. By convention, at the point loss of contrast becomes evident, the printer either discards the remaining solution or, if economy-minded, adds a few drops
of hydrogen peroxide to restore it, at least for a few more prints. The peroxide releases oxygen atoms which attach to and convert at least some of the ferrous iron back to its ferric state. The
Texas chrysotype process turns convention on its head by artificially aging AFO. Gold's contrast is tamed in the magical compound and, quite incidentally, gold can be fully printed out with no pre-humidification of paper.
The discovery of the Texas chrysotype formula arose from an unusual set of circumstances -- an alignment of the stars, as it were. An extremely hot summer in Central Texas, combined with a
faulty switch on an HVAC unit together resulted in the author's forced tolerance of a quite hot home interior that prematurely decayed a fresh batch of 25ml of 40% AFO. Unaware of the state of
decay of the solution and inspired by a heat-driven dream of molten iron and molten gold flowing together to create an alchemical solution, the author attempted to print a chrysotype even though the
small brown bottles of AFO and gold chloride were hot to the touch. Amazingly, an exquisite image printed out: the first Texas chrysotype.
That the above lacks contrast and Dmax was irrelevant at the time. After several months of (unsuccessfully) trying to produce a Chrysotype S print, any photographic image was welcome!
Further online research after the first successful Texas Chrysotype revealed that ascorbate is commonly used in laboratories to convert ferric iron to ferrous iron for processes such as
electrophoresis, water treatment and testing, and other uses. Determining a baseline formula took only a few hours: 8 drops of a 1% ascorbate solution added to each 10ml of 40% AFO, which is
then mixed with an equal volume of 10% gold choride. A minimum of 4 drops yields dry print out of a rather flat image with low contrast, extremely fine grain, and creamy gradation. A maximum of
12 drops will raise contrast (and grain) but not to an unpleasant degree and provides a chemical control for printing extremely flat negatives in gold. Beyond that much ascorbate, the ferrous iron
turns black as soon as the gold is added
Dmax can be increased in several ways:
- by adding more ascorbate (10 to 12 drops to each 10 ml of 40% AFO
- by diluting the gold solution to 5% and doubling the number of drops of gold then added to the AFO
- by immersing the print in a first bath of 10% ammonium dichromate
- by using a damper than normal brush to apply the solution and immersing the print in a first bath of very hot water (~135 degrees Fahrenheit)
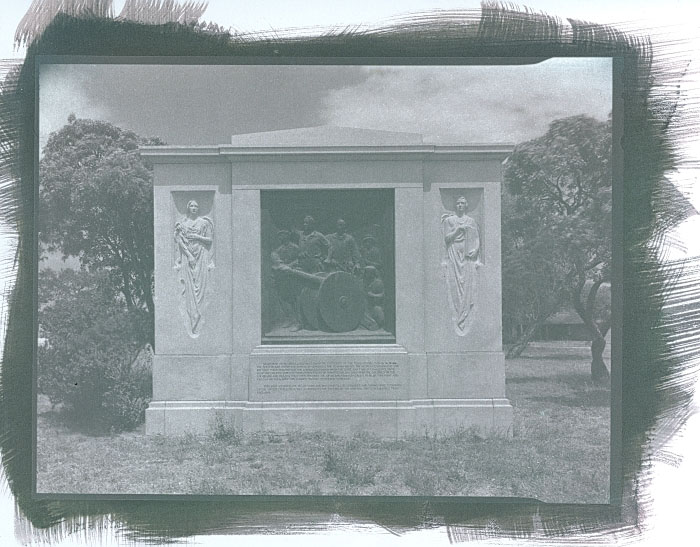
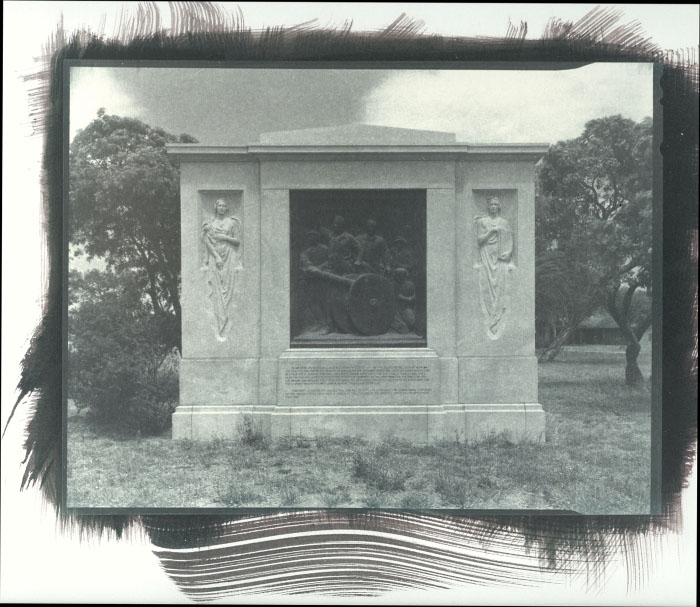
The author reprinted the above Come and Take It monument negative using the last technique above:
Overview of the Texas Chrysotype Process
The Texas Chrysotype process is characterized by:
- a maximum latitude of at least ten stops
- a full tonal scale with subtle midtones and expandable Dmax
- fine grain
- dry print-out with no additional development necessary
- stop development with a cold water or a cold, weak acid solution
- wet develop-out with various warm or hot acid solutions, such as boric acid or citric acid, to alter the color of the image
- modifiable contrast without severe degradation of image quality
- full print out with no concern for humidification
- economical 10% gold chloride solution
- support for negatives of widely varying contrast
- unique simplicity for printing most negatives
- fast printing times even with the most inexpensive UV lamp configuration (Feit 13w UV CFL bulbs)
- support for a variety of papers
The process has two limitations. First, contrast control requires several variations on the traditional AFO solution to be prepared in advance, each with a different number of drops of
ascorbate. Second, strenghtening Dmax requires the trade off of rougher transitions in midtones and more grain (unless you use an ammonium dichromate bath, in which case smooth tonal transitions and fine grain are preserved).
Negatives
The chrysotype of the Alamo, above, required no dodging or burning. A silver print from the same negative required extensive dodging and burning.
Recommended best practice is to expose film negatives for printing on grade 1 or 2 silver gelatin paper. Ansel Adams' The Negative would be an ideal starting point for anyone not familiar with
how to expose and develop a negative properly for printing on silver gelatin paper. Photographers who use digital equipment probably need little guidance -- a properly exposed and post-processed
digital raw file should suffice. I have observed two individuals printing with inkjet negatives on transparency film. Results were satisfactory, though neither had made any particular effort to
create a special Photoshop curve for gold. Certainly a curve designed for palladium or platinum would not be suitable, as gold both has a narrower latitude and behaves more like a pigment than
do the other noble metals. (I am sure digital photographers would appreciate someone developing a Photoshop curve expressly for the Texas Chrysotype.)
Colors
Prints develop out slightly (about 1/3 stop darker) in water or acid at room temperature. They do not develop out at all on immersion in very cold acid or water, but still darken slightly on drying
down. In either case, lower contrast prints made with AFO to which 5 or 6 drops of ascorbate have been added usually take on a lavender hue when immersed first in a mild (5%) citric acid.
Boric acid in a stronger solution (~40%) produces blue tones. Boric acid is inexpensive, widely available, and not terribly toxic. Existing documentation states that an initial tartaric acid bath
produces red tones with chrysotypes, though this has not been confirmed with the Texas Chrysotype process.
You can easily imitate the red tones that characterize the Chrysotype S process. However, in
addition to color, the print exhibits the coarse grain and high contrast typical of Chrysotype S prints. To print such an image:
- Use Revere Platinum 145 gsm paper.
- Pre-wet the paper with a very wet brush and allow any puddled water to soak in.
- When the paper is still wet enough to glisten when viewed at an angle in direct light, brush on the AFO/gold solution.
- Allow the paper to dry until no longer damp, but still very humidified.
- Expose to UV light, removing when desired print-out is reached.
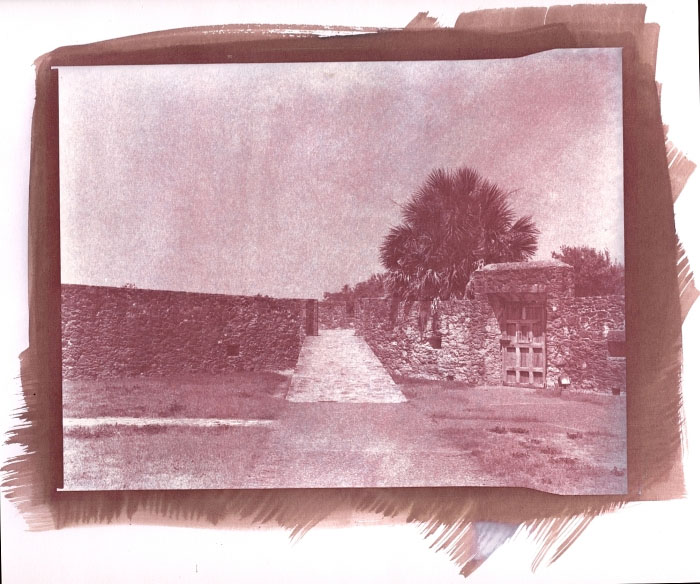
The following image was prepared using the above technique:
Executions, the Presidio, Goliad, Texas. 5.25 minute exposure under six Feit 13W UV CFL bulbs.
Materials
The minimum materials required for the Texas Chrysotype process are the generic tools used for virtually all alternative processes. For the sake of thoroughness, they are listed below, with
comments as appropriate.
- Pencil for outlining area to be coated
- Contact print frame (or two heavy sheets of glass)
- Brush (such as the Richeson 9010 - a reasonable size is 1/4 to 1/2 the short edge of your negative)
- Trays
- Nitrile or rubber gloves (not latex)
- Paper towels
- Running water
- Acetate or mylar sheeting (2 or 3 mil sheets, larger than the negative)
- 1 liter or larger cylinder
- 50 ml to 100 ml cylinder
- Eyedroppers (calibrated) or pipettes (preferred) - 1 for each solution
- 10 ml or larger brown glass bottles (1 for each AFO solution)
- Paper
- 10% Gold solution (Bostick and Sullivan, and many other suppliers on line)
- Paper
- UV exposure box (optional)
- Darkroom thermometer
- Stirring rod
- Gram scale
- Shot glass (or other small plastic or glass container)
- Undeveloped film or mat cut to same size as negative to be contact printed
- ruby lith tape for blocking off brush strokes (optional)
Papers
Because the AFO/gold solution is thinner (runnier) than platinum and palladium, you need a paper with a smooth, hard surface that keeps the solution from sinking too far into its fibers. Arches
Platine has proven itself to be the ideal paper for the process, yielding perfect results straight from the package, with precisely repeatable prints. One hundred percent rag cotton vellum papers yield
extraordinary images, with smoother tonal gradation and better Dmax than any other paper -- if you can manage the puckering when wet. Sixteen pound Clearprint and Pacific Arts vellums both yield
a very sharp and grainless image with superior Dmax, smoother tonal transitions and better tonal separation than any other paper. With a barely damp brush to apply the solution, the image is blue
-gray; with a damper (but not wet) brush, the image displays split purple and blue-gray tones. Arches Aquarelle, heavily sized with starch, displays appreciably lower contrast than Arches
Platine; Revere Platinum, also sized with starch, is nearly identical to Arches Platine. (Note: the author never tested sizing Platine with arrowroot starch, given Platine's genial printing nature.)
The recommended best practice for beginners is to start printing chrysotypes with Arches Platine. This superb paper provides the beginning chrysotype printer immediate gratification (especially if
you work with a printing frame that lets you drop half of the back to view print-out progress). After the first pricey package of Arches Platine, you will want either to switch to the inexpensive
vellums or to experiment with sizing the far cheaper Arches Aquarelle (less than half the price of Platine). Superb results, better than Platine affords, are obtained with Aquarelle by preparing a 2
% to 3% solution of arrowroot starch, immersing the paper fully in the solution (after it cools to room temperature) and leaving the paper in the starch for 30 minutes. Hang the paper to dry
thoroughly, then re-immerse the fully dry paper in the starch. Hang to dry by the opposite corner from the first coating. Allow the paper to dry overnight before printing. The same process works with Revere Platinum 300 gsm.
Note: Gelatin sizing did not work with any paper, and online research suggests gelatin is incompatible with gold.
If you are interested in a special effect, such as printing on translucent paper and backing the paper with gold foil, use Clearprint or Pacific Arts vellum. Note that vellum puckers severely when wet
and achieving a sharp print requires careful attention to ensuring paper flatness during printing.
Work (Tested)
- Arches Platine (directly from package -- no sizing)
- Revere Platinum 145 gsm very wet: grainy, contrasty image
- Revere Platinum 300 gsm sized with 3% arrowroot starch: similar image quality to Platine
- Arches Aquarelle sized with 2% arrowroot starch: extraordinary image quality equal or superior in tonal gradation to Platine
- Clearprint Vellum
- Pacific Arts Vellum
Note: Vellum papers in general should work provided they are 100% pure cotton fiber; other vellum papers, such as Canson Vidalon, may fall apart during the long washes.
Untested (but probably works)
- Revere Platinum 145 gsm sized with 2% arrowroot starch
Does not work (Tested)
- Canson 2 Ply Bristol Vellum sized with arrowroot starch as well as unsized
- Stonehenge sized with arrowroot starch as well as unsized
Preparing a 2% solution of arrowroot starch
- Stir 20 grams arrowroot starch into one liter cool distilled water.
- Stir vigorously while slowing heating the solution to a boil. You want to dissolve all solid particles rapidly and avoid clumping.
- Lower heat once solution reaches full boil to avoid overflow from the pan.
- Continue stirring until the solution is clear and you observe no solid particles suspended in solution. It will still look milky, but you should be able to discern the stirring spoon at the
bottom of the pan. Continue boiling for at least another five minutes after you are sure the solution is clear enough.
- Remove from heat and allow the solution to cool to room temperature.
- Mark the back of paper to be sized with a pencil.
- Immerse one sheet of paper into the solution and leave it immersed for 30 minutes (more than one sheet if you have a sufficiently large tray).
- Remove the paper from the solution by one corner and hang to dry fully (typically several hours).
- You can repeat the above steps 6-8 for additional sheets of paper while drying.
- When the sheet is quite dry, repeat steps 6-8.
- Hang the paper to dry by the opposite corner from which you previously hung it.
- Allow to dry fully before using.
For the recommended 3% solution for sizing Revere Platinum 300 gsm paper, dissolve 30 grams of arrowroot starch in one liter of cool distilled water. Otherwise, steps 2-12 above are identical.
Chemicals
In addition to gold chloride and ascorbate you need to make the standard solution for printing and clearing the Texas Chrysotype. For each additional 10 ml of AFO solution, add 4 grams of crystals
and 10 ml distilled water. A few ml of 1% ascorbate will treat quite a large volume of AFO.
All chemicals are readily available on line (Bostick & Sullivan, Digital Truth, Artcraft Chemicals, Photographers Formulary, Freestyle, etc.). Ascorbate can be purchased at most health food stores
as well as many pharmacies. Boric acid is widely available at grocery stores and is also the ingredient in Roach Pruf.
For reference, a given solution in percentage expresses the number of grams of the dry chemical to dissolve in 100ml of distilled water. (You dissolve the measured weight of the dry chemical in a
volume approximately 75% the final volume and top off the solution.) 40 grams of a chemical dissolved in water to make up a 100 ml solution would be 40% and 4 grams added to 100 ml a 4% solution.
Important: Carry out all work with AFO in crystal or liquid form in tungsten (not fluorescent) light, at a maximum illumination of 60 watts at least six feet away.
- 12 grams AFO crystals
- .5 gram Ascorbate (Ascorbic Acid, Vitamin C)
- 80 ml distilled water
- 10% Gold Chloride solution
- 5 grams Citric acid, if printing on Arches Platine. Dissolve 5 g in 1 liter water.
- 5 grams Tetrasodium EDTA, if printing on other papers. Dissolve 5 g in 1 liter water. Wear nitrile or rubber gloves.
- Hypo Clear (Sodium Sulfite 200 g and Sodium bisulfite 2 g dissolved in 750 ml water, topped to 1000ml and diluted 1:9 for a working solution)
Optional Chemicals
- Boric acid (widely available for blue prints)
- Phosphoric acid (Lime Away is a very expensive alternative) for developing out accidentally underexposed image. Wear nitrile or rubber gloves.
- Tartaric acid for red tones
- Oxalic acid for developing out slightly with more contrast. Wear nitrile or rubber gloves.
- White vinegar or ascorbic acid to stop development without altering print color
- Ammonium dichromate for first bath to add "snap" to a flat print. Wear nitrile or rubber gloves.
Preparing the Solutions
The savings obtained in buying gold chloride and dissolving it are negligible, given that most of the cost of gold lies in the metal's intrinsic value. Ascorbate is fairly inexpensive in crystal form,
as is AFO. You will absolutely have to mix some of the chemicals yourself, such as Tetrasodium EDTA and citric acid, so bite the bullet and purchase a scale. A $20 digital scale purchased off
Ebay will quickly pay for itself in savings. Just be sure your scale can measure weights at least as small as .5 gram. Otherwise, you may find yourself mixing up volumes in terms of liters rather than 10 ml or 50 ml.
Handle AFO only in tungsten (not fluorescent) light. Maximum intensity is 60 watts and light should be at least 6 feet distant from the AFO.
- Dissolve .5 mg ascorbate in 50 ml distilled water (or just .1 in 10 ml if your scale permits). Store in a bottle labeled C.
- Dissolve 12 grams of AFO in 25 ml distilled water. Top off to 30 ml.
- Prepare three adhesive labels and apply them to the three small brown glass bottles, one AFO+6, one AFO+8, and one AFO+10.
- Pour 10 ml of AFO solution into each of three separate brown glass bottles with eyedropper caps.
- Add 6 drops of ascorbate to the bottle labeled AFO+6. Agitate vigorously for a few seconds. This is your low contrast solution. Use this for printing very contrasty negatives.
- Add 8 drops of ascorbate to the bottle labeled AFO+8. Agitate vigorously for a few seconds. This is your normal contrast solution. Use this for printing normal contrast negatives.
- Add 10 drops of ascorbate to the bottle labeled AFO+10. Agitate vigorously for a few seconds. This is your high contrast solution. Use this for printing soft negatives or for
negatives that require a boost of Dmax.
Note: You may find you need additional solutions with 4, 5, 7, 9, 11, and 12 drops added to 4 bottles of 10 ml 40% AFO. AFO+4 will produce an ultra low contrast image. Recommended
processing with AFO+4 and AFO+5:
- Pre-wet paper with a wet brush and allow any puddles of water to be absorbed.
- Apply the AFO and gold solution with a slightly damp brush.
- Allow to dry only until the surface is just barely damp.
- Print the image normally.
- If contrast boost is needed, immerse in 10% ammonium dichromate.
For 10 or more drops of ascorbate added to the AFO, you will have to brush the gold and AFO solution onto the paper as quickly as possible after pouring it; otherwise, your print may suffer
deep stains where the drops of AFO/gold sank in quickly.
Printing
Fine art contact papers have a smooth side and a rough side. If you are not able to distinguish the difference visibly, you can feel the paper. (Make sure your fingers
are clean and dry!) For chrysotypes, apply the emulsion to the smooth side. The rougher side of paper will absorb excessive gold and AFO, resulting in an unsatisfactory image.
When calculating exposure, be aware that the print will typically darken by about one third stop after it has completely dried. Print approximately one third stop lighter than the desired density of
the final print.
Important: Carry out all work from step 3 through step 15, below, in tungsten (not fluorescent)
light, at a maximum illumination of 60 watts at least six feet away. Wear nitrile or rubber gloves.
- Place an undeveloped negative or matte on the smooth surface of a sheet of paper. With a pencil, trace a light outline of the negative on the paper.
- Wash the application brush thoroughly under running water. Wearing gloves, hold a heavy paper towel in one hand and wipe the brush damp with the paper towel. If you are
particularly obsessive about dust (and animal hairs, if you keep pets), draw both sides of the brush across a sheet of scrap paper. Place the brush aside, close at hand.
- Count out the appropriate number of drops of AFO into a shot glass (approximately 6 drops for a 5x7 negative, 12 for an 8x10). Add to that an equal volume of the gold solution. Swirl
vigorously for a few seconds.
- Pour the solution along the narrow edge of the negative outline, inside the pencil lines.
- Immediately brush the liquid across the full length of the outline. Brush steadily, confidently and deliberately – neither rapidly, nor too slowly. Continue until you have spread the solution
evenly across the paper. If dust specks or animal hairs are transferred onto the paper from the brush, flick them away with a gloved fingertip and brush to smooth out the spot.
- Place the brush in water and transfer the coated paper to a dark spot to dry. Sufficient drying typically takes ten to fifteen minutes. Do not allow the paper to over dry – your final print
will be lacking in contrast and Dmax. (The author has observed contrast loss with 30 minutes of drying.)
- Rinse the solution from the brush and set it aside. Do not place the brush on a metal or painted surface, unless your intent is to decorate with lavender smudges...
- If you are using a UV lamp box, turn on the lamps to warm up about five minutes before the print is ready.
- The print is ready when the surface is just dry and not damp. Place the paper emulsion side (yellow) up in your contact print frame.
- Place a 2 or 3 mil sheet of acetate/mylar on the paper covering the coated area. This sheet is necessary to protect the negative from serious damage. Do not deceive yourself that the paper
is sufficiently dry not to damage the negative. The heat from the UV bulbs can generate an AFO steam, from an apparently dry sheet of paper, that settles between the acetate/mylar
sheet and the negative and subsequently corrodes the emulsion. I have had two negatives ruined this way.
- Place the negative to be printed face down onto the acetate/mylar sheet and close the frame.
- Place the print frame in direct sunlight or in the UV lamp box.
- Start a timer.
- When you have determined the exposure, slide the paper face down into a tray of very cold water. (If you have cooled the water by adding ice cubes, be careful not to let any ice come
into contact with the emulsion area.) Agitate gently for ten minutes. If the image is slightly underexposed (1/2 to 2/3 stop), slide the paper face up into a tray with warm (~85° F) 5%
citric acid to cover the print. Agitate gently until the print reaches the desired density.
- Pour off the water and immerse the print in a 5% solution of citric acid (or tetrasodium EDTA) for fifteen minutes. Agitate gently every minute or so. This first bath removes most of
the iron in the emulsion, so do not cut the bath short. (The citric acid, or EDTA, should be reusable for about five 8x10 prints. Discard when it takes on a yellowish tinge.)
- Remove print from the citric acid (or EDTA) and immerse it in cool running water for five minutes.
- Remove the print from the water and immerse it in a standard strength solution of Hypo Clear or other sodium sulfite solution. Agitate gently for fifteen minutes.
- Remove the print from the sulfite and immerse it in cool running water for five minutes.
- Immerse the print in a second 5% solution of citric acid (or tetrasodium EDTA) for fifteen minutes. Agitate gently. (This second solution will last much longer than the first. It can be
"demoted" to first citric acid (or EDTA) wash after the original one is exhausted.)
- Wash in running cool water for one hour, unless you have printed on vellum in which case wash for 30 minutes.
- Hold the print by one corner to drain off the excess water.
- Place the print flat on blotter paper to dry.
Printing Problems
You will certainly have unsatisfactory results at some point. It is inevitable. This section identifies the commonest problems and provides solutions for resolving those problems.
Problem: Prints consistently darken too much on immersion into first bath.
Solution: Use ice cold water for the first clearing bath or reduce exposure time by about 10%.
Problem: Print accidentally underexposed (too light) approximately one-half to one stop.
Solution:
Immerse print in a warm bath (~95° F) of 18% phosphoric acid. Lime Away mixed with 50% water is an adequate substitute. Place tray under an overhead fan hood. Do not inhale the
fumes. Wear a respirator if necessary. Note: Substitute a 40% solution of boric acid for the phosphoric if you do not object to a blue print. The boric acid is considerably less noxious.
Problem: Print severely underexposed approximately one and one-half to two stops on removal from print frame.
Solution
: Immerse print into a hot bath (~130° F) of 18% phosphoric acid. Lime Away with 50% water is an adequate substitute. Place tray under an overhead fan hood. Do not inhale the fumes.
Wear a respirator if necessary. Note: You can substitute a 40% solution of boric acid for the phosphoric if you do not mind a blue print. The boric acid is considerably less noxious.
Problem: Print too dark.
Solution: Try immersing the print in a 5% solution of oxalic acid at room temperature. This rarely
yields a satisfactory print, but I have successfully lightened a few prints with this method.
Problem: Print too grainy.
Solution: Grain is caused by either of excess ascorbate in the AFO or an excessively wet brush.
The brush should be just damp enough to prevent excessive absorption of solution. If a wet brush is not the cause of the grain, reprint with a solution of one or two drops fewer 1% ascorbate added to the 40% AFO.
Problem: Insufficient Dmax.
Solution: If you identify the weak Dmax on removing the print from the frame, immerse the print in
a warm solution of 10% ammonium dichromate. Caution: Wear rubber or nitrile gloves at all times when working with dichromate. Otherwise, if the image fails to print or develop out with adequate
Dmax, reprint with 40% AFO with 2 drops more of ascorbate solution added (unless you are already using AFO with 10 drops ascorbate per 10 ml). As a last resort, you can try grossly
underexposing a print made with that negative and developing it out in very hot boric acid. See the instructions for making a blue print, above under Colors. Finally, reprint with a solution of one or
two drops more 1% ascorbate added to the 40% AFO. If none of these solutions work, try printing with vellum paper.
Problem: Print red, grainy and contrasty.
Solution: Your brush was too wet, or you are using a light-weight paper. Use a damp, not wet,
brush. Better yet, switch to Arches Platine or a paper sized heavily with starch.
Problem: Print contrast too low on removal from frame.
Solution: Develop out for 1 to 5 minutes in a 10% solution of ammonium dichromate at room temperature.
Problem: Print highlights yellow after processing.
Solution: Immerse the print in a 5% solution of oxalic acid until highlights clear.
Retouching Prints
The principles for retouching chrysotypes are the same as those for retouching silver, platinum and palladium prints: Retouch as little as possible; retouch using the smallest tool points possible;
retouch the smallest area at a time as possible.
Retouching White Spots
For white spots, generally caused by dust particles settling on the print before exposure, you can
use either spotting dyes or India ink applied with 000 or 00 brushes. Apply the absolute minimum amount of fluid and slowly build up density in an area within and smaller than the spot (unless it is
very small). A 000 brush is strongly recommended. Excess water will at least "crater" a spot, rendering the circumference darker than surrounding gold, and at worst stain the print irreversibly.
In other words, less is always more, and the least is the most desired. India ink is available in a variety of colors, including red, blue and violet, which can be mixed to obtain a specific shade.
Retouching Black Spots
To remove black spots, you need a magnifying glass (preferably stand mounted; otherwise, a third arm is desirable) and a sewing needle or X-Acto blade. While the print is still damp, gently and
with great deliberation use the tip of the needle or the blade to break a black spot up into smaller pieces. You will often find you do not need to remove the individual pieces of the original spot
after you have broken it apart. If you must, try removing only a piece or two of the broken spot, effectively reducing the overall size of the dark area to imperceptibility. The risk with black spots
lies in damaging the surface of the paper, which no retouching will repair. Again, less is always more, and the least is the most desired.
The Texas Chrysotype Revolution
|


