|
The Effects of Pyro Stain
in Platinum Printing
by Bob Herbst
'In the beginning there was platinum and the world was void and without form. And then God said, "Let there be pyro", and it was good.' So maybe I am getting a little
carried away. Using pyro is not exactly a religious experience although some promote it with almost religious fervor. I have  been accused of being in the latter category. In
reality, I believe excellent platinum/palladium prints can be made from negatives developed in any of the traditional developers given that proper care is taken in controlling the development process.
But for me and many other photographers, pyro offers an array of advantages over traditional developers. I wrote of some of these in my article in the September/October 1997 issue of View Camera, "The Advantages of Pyro for Platinum
Printing". been accused of being in the latter category. In
reality, I believe excellent platinum/palladium prints can be made from negatives developed in any of the traditional developers given that proper care is taken in controlling the development process.
But for me and many other photographers, pyro offers an array of advantages over traditional developers. I wrote of some of these in my article in the September/October 1997 issue of View Camera, "The Advantages of Pyro for Platinum
Printing".
In the winter of 1998, I called Dick Arentz to inquire about the platinum workshop he was holding in the spring. Even though I have been
printing and exhibiting platinum/palladium prints for over 8 years, I am always interested in improving my art form. Dick had seen my article, and was interested in talking more about my
experience with pyro. A number of students attending his workshops brought negatives developed in pyro. His system of printing relies on use of a black and white densitometer to read the
negatives. The effects of pyro stain renders such density readings useless so he was curious if a conversion factor could be established that would correct the density readings for the stain.
I decided to attend his workshop, had a wonderful time, got temporarily lost in the desert for an hour on a field trip, and came away with a suggestion from Dick to do a sensitometric analysis of
the effects of pyro stain in platinum printing. To my knowledge, such an analysis had never been done. All of the articles to date including my previous article have been based on intuition,
personal experience, and guess work, so I wanted to attempt to find some factual basis for the wide range of folklore and myth on this topic. I decided to further explore the characteristics of
pyro and the stain it produces in a more quantitative approach. I had the good fortune to have just inherited a rather high quality color densitometer so I had the necessary tools.
 Now you must understand that I have resisted the temptation
for many years to run detailed film/development tests complete with graphs, charts, and spreadsheets full of data. My educational background is in the sciences with degrees in
both physics and computer science. My photography is my art, which I pursue to add balance in my life. I base my photographic explorations on instinct and emotions and I
make a great effort to not turn my artistic endeavors into an analytical science project. So to take Dick up on his suggestion was quite a stretch for me. But in the end, I must
say I gained quite a bit of insight about my process, the effects and subtleties of pyro, and why intuitively, I have always felt it to be a superior negative developer for use in printing in platinum/palladium. Now you must understand that I have resisted the temptation
for many years to run detailed film/development tests complete with graphs, charts, and spreadsheets full of data. My educational background is in the sciences with degrees in
both physics and computer science. My photography is my art, which I pursue to add balance in my life. I base my photographic explorations on instinct and emotions and I
make a great effort to not turn my artistic endeavors into an analytical science project. So to take Dick up on his suggestion was quite a stretch for me. But in the end, I must
say I gained quite a bit of insight about my process, the effects and subtleties of pyro, and why intuitively, I have always felt it to be a superior negative developer for use in printing in platinum/palladium.
There were several areas in particular I wanted to investigate:
1. Show that stain is proportional to silver density
2. Measure the amount of printing density added by the stain
3. Determine if the stain has an even more pronounced effect in the platinum process than in silver printing
4. Determine if pyro contributes to being able to produce both a platinum and silver print from the same negative
My approach was fairly simple. I contact printed a 4x5 Stouffer step tablet onto several sheets of 4x5 TMAX 400 film with identical exposures and developed the film in my standard pyro formula
and in D-76. The goal was to produce a reversed image of the step tablet and then measure the densities on both a black & white densitometer and a color densitometer through the red (R), green
(G), and blue (B) filters. Since platinum is only sensitive to ultraviolet light (extreme blue) the effects of the stain should be seen in the different color density readings i.e. greater density from
the blue filter than from the red or green.
The Stouffer step tablet is an ideal tool for this experiment. It contains 21 steps each one half stop apart or 0.15 difference in density. One stop or zone of density equals 0.3, one and a half stops
equals 0.45 of density, two stops equals 0.6, and so on. I used my enlarger fitted with an Aristo cold light as a light source for exposing the step tablet onto the TMAX film. The films were placed
emulsion to emulsion in a contact frame. All exposures were 1 second at f16. I placed a piece of black gaffer's tape in the margin of the step tablet
to establish a film base + fog (fb+f) reading. My enlarger is fitted with a Zone VI stabilizer and photocell and I use a digital timer accurate to 0.05 seconds. This combination produces extremely
consistent exposures. The negatives were developed in trays. For the D-76 negative, I used stock solution for 13 minutes at 68 degrees. The pyro negative was developed in a 1:1:15 solution for
15.5 minutes at 68 degrees. (See my previous article for developer formula.)
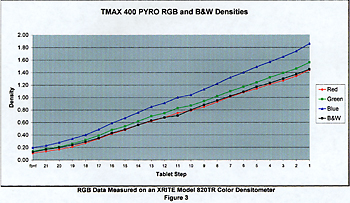
Each step of each negative and the Stouffer step tablet were read with an X-Rite model 820TR color densitometer yielding density readings for the red, green and blue filters. The negatives and step
tablet were also read in a black and white densitometer which was calibrated with the same calibration reference standard traceable to the National Bureau of Standards. The density data
was entered into an Excel spreadsheet and plotted using Excel's graphing tools. The density readings of the negatives and step tablet are shown in the graphs in Figures 1-3. The graphs show that for
both the step tablet and the D-76 negative, the densities for red, green, and blue filters and the readings from the black and white densitometer are almost identical.
The graph of the pyro negative tells a completely different story. There is a definite divergence of the data for the red, green, and blue filters showing clearly the additive effect of the stain on total
negative density. Note that the black and white readings track almost identically to the red filter readings explaining why black and white densitometers are useless for reading pyro
negatives. Both silver and platinum materials are not sensitive to red light so this data can be ignored. The greatest divergence occurs in the line
showing blue density. By comparing the blue filter and B&W data, you can see that the stain is adding only a very small amount of density in the shadow values - about a quarter stop(.07). But at
the far right end of the scale in the highlight region, the pyro stain is adding a full stop of density (0.34) over the B&W reading showing conclusively that the density added by the stain is indeed
proportional to the silver density.
But, blue filter readings of the pyro negative do not give a true indication of how much printing
density is added by the stain in a platinum/palladium print. The blue filter is measuring blue light in the visible spectrum, not the ultraviolet light to which platinum materials are sensitive. Using an
Aristo Platinum Printer as a light source, I printed both negatives in platinum/palladium with my standard mixture (60% platinum/40% palladium) and paper, Cranes Parchmont Wove. I included a
Stouffer step tablet strip in each print as a reference to normalize the print densities of the negatives. The print time was adjusted such that step 5 of the reference strip yielded
approximately a 90% black (zone 1) in both prints. I read the reflective print density of each step and correlated the negative density in the D-76 and pyro negatives to determine which steps
resulted in the same print density. This told me how much printing density the stain added. The reflective density readings are included in the table in Figure 4.
These prints yield some interesting insights in a number of areas. As expected, the pyro stain has an even greater effect than the blue filter reading
indicates. At the shadow end of the scale, step 17 prints almost exactly the same in both negatives. The blue density of the D-76 negative at this step is .44 with fb+f subtracted, but the blue density
of the pyro negative for step 17 is only .29 with fb+f subtracted - a difference of one half stop in blue filter density. Yet the print density is about the same. Hence the pyro stain is adding one half
stop of printing density more in the shadow values than the blue filter readings indicate.
However, the effect of the pyro stain becomes more pronounced at the highlight end of the scale.
Step 5 of the D-76 print has approximately the same reflected density as step 2 of the pyro print. The blue density of step 5 on the D-76 negative is 2.06 with fb+f subtracted yet the blue density of
step 2 in the pyro negative is 1.54, almost 2 stops less in the blue filter density. But since these two steps yield approximately the same print density, we can conclude that the pyro stain is adding
two stops more printing density than the blue filter reading indicates!
From this data, it appears that it should be possible to obtain a silver print of about the same
density range as a platinum print from the same negative. We already know that the stain is adding two full stops of printing density in a platinum print at the highlight end of the scale over what
visible blue light would see yet the added printing density at the shadow end of the scale is less than one half stop. Silver papers are sensitive to visible blue and green light. In variable contrast
silver papers, blue light results in higher contrast, and green light in lower contrast. A good example of this is the Aristo VCL4500 variable contrast cold light head. It has two tubes - one
blue and one green. By varying the amount of light from each tube, the contrast of the resulting print is controlled. The more blue light, the higher the contrast. The more green light, the lower
the contrast. The yellowish-brown pyro stain tends to block blue light as shown by the higher density readings for the blue filter. It passes more green light as shown by the lower density
readings for the green filter. Hence a silver print from the same negative will be of lower contrast for a silver based variable contrast paper since the negative is passing more green than blue light.
 To test this theory, I contact printed the same two negatives on
a grade 2 silver paper. The reflective densities of the silver prints are also shown in the table in Figure 4. The data shows
conclusively that the pyro negative yields a print in both platinum/palladium and silver which can represent a subject with a brightness range of 9 stops. The actual print reflective
density range of the platinum/palladium print is only about 5 stops but the subject brightness range represented is 9 stops - from step 1 to step 19. The actual print reflective density
range of the silver print is about 6 stops and the subject brightness range represented is also 9 stops - from step 3 to step 21. Hence, both a platinum and silver print representing
the same subject brightness range can easily be made from the same negative. To test this theory, I contact printed the same two negatives on
a grade 2 silver paper. The reflective densities of the silver prints are also shown in the table in Figure 4. The data shows
conclusively that the pyro negative yields a print in both platinum/palladium and silver which can represent a subject with a brightness range of 9 stops. The actual print reflective
density range of the platinum/palladium print is only about 5 stops but the subject brightness range represented is 9 stops - from step 1 to step 19. The actual print reflective density
range of the silver print is about 6 stops and the subject brightness range represented is also 9 stops - from step 3 to step 21. Hence, both a platinum and silver print representing
the same subject brightness range can easily be made from the same negative.
The same is not true for the D-76 negative. The subject
brightness range of the D-76 negative represented in the platinum/palladium print is 8 stops - from step 3 to step 19. But the subject brightness range represented in the silver print is only 5.5 stops -
from step 9 to step 20. Thus, the subject brightness range rendered in the platinum/palladium print and the silver print from the D-76 negative differs by 2.5 stops! This difference might be
narrowed through use of much lower contrast grades of silver paper but the separation of values will be reduced. Split filter printing might compensate for this but now you are getting into more
complex print manipulation. Another alternative is to reduce development of the D-76 negative to print better on silver paper, but then more potassium chlorate must be added to the
platinum/palladium sensitizer resulting in more uneven tones in the print. Either way, print quality compromises are required if one wants to print both platinum and silver from the same negative
developed in D-76 or other traditional non-staining developer formulas.
This series of tests provided a few more insights into advantages of using pyro for platinum
printing. Because of the additive density effects of the stain, much less potassium chlorate is required for the same print contrast in the platinum print than for a negative developed in
traditional developers. Increased amounts of chlorate tend to cause grainy or coarse tones in platinum prints. Using less chlorate results in smoother tones and allows for better separation of
highlights because the silver densities are not being pushed to the film's maximum limits. Some printers might consider this a disadvantage because since you are working in the mid-range of
contrast grades with very little chlorate, you do not have as much latitude to reduce print contrast from a high contrast negative. But in my personal experience, I have rarely had a need to lower
contrast in a platinum/palladium print. I usually need to increase contrast.
Another observation from these tests is that my time and temperature combination for pyro
development yielded a longer scale negative than D-76. As we saw in the print comparisons, pyro compresses the subject brightness range resulting in a print with 9 stops of subject brightness
without overly compressing any one portion of the scale. Prior to running these tests, my experiences in photographing in cathedrals and the canyons of southern Utah showed this
characteristic of pyro. I frequently exposed images with a brightness range from zone 2 to zone 11 and this range was accurately rendered in the resulting prints. I believe that adjustments to the
development of a D-76 negative may be able to produce similar results although separation in the shadow values might be reduced. This area requires further investigation before any conclusions can be made.
 As we discussed this project, Dick originally
thought that my tests could yield a conversion factor which could be applied to a pyro negative to compensate for the effects of the stain in printing. However, the amount of stain produced by pyro is
unique to each photographer's process depending on method of development, formula, dilution, development time, and degree of developer oxidation. Therefore, the data presented here can
only be used as a general reference on the effects of pyro stain in platinum printing. Each photographer must run his or her own tests for their own development process. From an artistic perspective,
this is one reason why I like pyro so much. Because the effects of pyro and its stain vary from user to user, it results in a more personal interpretation or unique signature of the photographer using it. As we discussed this project, Dick originally
thought that my tests could yield a conversion factor which could be applied to a pyro negative to compensate for the effects of the stain in printing. However, the amount of stain produced by pyro is
unique to each photographer's process depending on method of development, formula, dilution, development time, and degree of developer oxidation. Therefore, the data presented here can
only be used as a general reference on the effects of pyro stain in platinum printing. Each photographer must run his or her own tests for their own development process. From an artistic perspective,
this is one reason why I like pyro so much. Because the effects of pyro and its stain vary from user to user, it results in a more personal interpretation or unique signature of the photographer using it.
This little research project as been a pleasant diversion and I hope it provides some insight into the effects and advantages of pyro in platinum printing. But it can not replace the pleasure of
seeing images come alive in a good printing session. It is time to set aside the densitometer and resume my artistic endeavors. Here's wishing you good printing no matter what film developer you use.
Bob Herbst's Pyro Formula and Processing
My pyro formula is a variation on the original Wimberly WD2D formula originally published in Petersen's Photographic in 1978 and later re-published in Darkroom and Creative Camera Techniques. My formula and processing practices do not necessarily follow the philosophy of
maximum stain/minimum silver. Stain is your friend but it can be your enemy in printing alternative processes. Too much stain can easily extend printing times to an hour which I find
unacceptable. The pyro-metol formula is identical to Wimberly's WD2D formula except for the restraining agent in solution B. The formula is as follows:
 Originally, I included 1.1 grams of potassium bromide in
Solution B as a substitution for Kodak anti-fog which was called for in the original WD2D formula. I had difficulty obtaining sufficient contrast in the resulting negatives and
development times were exceedingly long. On the advice of Gordon Hutchings, I eliminated the bromide which solved both problems. I have not noticed any fogging problems after
a couple thousand 4x5 and 8x10 negatives. Originally, I included 1.1 grams of potassium bromide in
Solution B as a substitution for Kodak anti-fog which was called for in the original WD2D formula. I had difficulty obtaining sufficient contrast in the resulting negatives and
development times were exceedingly long. On the advice of Gordon Hutchings, I eliminated the bromide which solved both problems. I have not noticed any fogging problems after
a couple thousand 4x5 and 8x10 negatives.
I use TMAX 400 in 4x5 and 8x10 exclusively for my platinum negatives. Its pronounced contrast and beautiful edge effects
are a perfect combination for platinum. I have tried Tri-X and found results similar to TMAX but the reciprocity characteristics requiring ever increasing exposure in low
light situations make long exposures difficult to manage. Many of the exposures inside the cathedrals required 10-30 minutes on TMAX 400 which would have been at least an hour or two with Tri-X. Also, edge
effects do not seem nearly as pronounced with Tri-X as with TMAX. I rate TMAX 400 at 200 and reduce development to maintain good fat shadow detail yet printable highlights.
Negatives are developed in trays - eight to twelve 4x5 sheets or six to eight 8x10 sheets at a time. Agitation is constant in that I am constantly moving the bottom sheet to the top of the pile
throughout the development process. The negatives are presoaked in water for 2 minutes and then transferred to the pyro. My standard developer dilution is 1:1:15 for solutions A, B, and water
respectively. This dilution seems to work well for normal and both minus and plus development of negatives. For normal negatives, I develop TMAX 400 at 68 degrees for 15.5 minutes plus 30
seconds to displace the water from the presoak. I have not tried other dilutions since this one has served all of my needs. The negatives are developed emulsion side up and half way through the
development time, I rotate the stack 180 degrees to even out development. Otherwise the end of the negatives that are lifted to remove the bottom negative from the stack tend to get slightly less
development since they are repeatedly lifted above the surface of the solution even if only for a brief moment. I have tried emulsion side down development but had too many scratches in the
negatives which I can not completely explain.
A tray of distilled water is used instead of an acid fixing bath. I figure any developing action
which continues before the negatives hit the fixer only enhances the shadow detail with very little effect on the highlights. I started this practice when I was having some problems with my
development process and was trying to eliminate variables. I saw no significant differences between an acid stop and a water stop bath so I stayed with the water. It is cheaper particularly
since the stop bath must be discarded after each process cycle because of the oxidized pyro carry over from the developer tray.
Contrary to most of the experts' recommendations I use a pre-packaged hardening fixer, Kodak Fixer(gasp!), which undoubtedly removes some of the stain. Some day I may move to mixing my
own fixer for economy but prefer to pay a little more and spend my time on the creative process rather than mixing chemicals. Fix TMAX 400 for 10 minutes in Kodak Fixer. Some of the pink
anti-halation dye will remain after the fixing bath but this will disappear after hypo clearing agent and washing. Use fresh fixer for each batch of film or a two bath method with the second bath
used as the first bath for the next batch of film.
 The developing action of pyro and the associated stain effects are very sensitive to small variations in developer temperature. Pyro oxidizes more
rapidly as the temperature of the solution increases. If you tray develop, use a water bath around the trays. Without a water bath, a 68 degree solution will easily climb to 70 degrees during development
just from heat transfer from your fingers. If the air temperature in the room is higher than the developing temperature, the solution temperatures will gradually rise as well without a water bath. A
two degree increase in developing temperature can have a significant effect on total negative density for a pyro negative. The accelerated action of pyro on both silver density and increased stain is
additive in the resulting negative and therefore has an almost doubling effect as if the negative had actually been developed even longer. The increase in stain has the greatest impact for platinum
printing. Pyro does not oxidize as quickly in a full closed tank. The staining effects are less pronounced for the same development time which must be taken into account when developing roll
film intended for platinum printing in pyro. The developing action of pyro and the associated stain effects are very sensitive to small variations in developer temperature. Pyro oxidizes more
rapidly as the temperature of the solution increases. If you tray develop, use a water bath around the trays. Without a water bath, a 68 degree solution will easily climb to 70 degrees during development
just from heat transfer from your fingers. If the air temperature in the room is higher than the developing temperature, the solution temperatures will gradually rise as well without a water bath. A
two degree increase in developing temperature can have a significant effect on total negative density for a pyro negative. The accelerated action of pyro on both silver density and increased stain is
additive in the resulting negative and therefore has an almost doubling effect as if the negative had actually been developed even longer. The increase in stain has the greatest impact for platinum
printing. Pyro does not oxidize as quickly in a full closed tank. The staining effects are less pronounced for the same development time which must be taken into account when developing roll
film intended for platinum printing in pyro.
This article is copyright 1998 by Bob Herbst. All rights reserved.
No part of this article may be reproduced in any form without the express consent of the author.
|
Artist's Biography
Bob Herbst has been photographing and printing in platinum and silver gelatin for over 30 years. He has gained
international recognition as a master platinum printer and his work is represented in collections in both the U.S. and Europe. His work spans both landscape and architectural subjects
and he works primarily with 4x5 and 8x10 view cameras. His platinum work has been displayed in numerous solo exhibitions and juried shows. Bob is a contributing writer for View Camera magazine and he prints platinum editions on a commission basis. Bob teaches workshops on platinum/palladium printing and has taught undergraduate and graduate classes at the Cleveland Institute of Art, the University of Akron and at Hiram College in Ohio. He is a member and officer of the Board of Trustees of the Friends of Photography of the Cleveland Museum of Art.
|
|
|
|