|
Photopolymer Printing
aka Solar Printing, Photo Intaglio Printing and Polymer Photogravure
by Jim Read
 The very first printing was done from wood blocks using water based inks and many of these wood block prints have survived intact for 500 years. One tends to doubt that modern
(from 1880ish) solvent based inks on acid paper will last as long. Alas, printers have died for their art: these solvents are carcinogenic and the etching acids poisonous.
Photopolymer plates and modern formula water based inks have changed that. The very first printing was done from wood blocks using water based inks and many of these wood block prints have survived intact for 500 years. One tends to doubt that modern
(from 1880ish) solvent based inks on acid paper will last as long. Alas, printers have died for their art: these solvents are carcinogenic and the etching acids poisonous.
Photopolymer plates and modern formula water based inks have changed that.
I think the photopolymer process fits into the printmaking repertoire in making an impression
of an image rather than an exact representation. The actual printing takes seconds, is completely permanent and takes on a warmth and beauty that is not present in any other photographic process.
It's akin to the one picture at a time approach favoured by the large format photographer where most of the time is spent in making the image fit for the process.
Initial research
I first came across the process early in 2004 through my friend AnneMarie Tornabene and started
looking round for details on the web. I came across Solar Plates and thought “ahhh! this is it!”
Then, as one does, I found out the price for photopolymer plates. Wow! I am a person of limited means and prefer to use processes that require 'kitchen sink' methods to obtain results. So I had to
figure a way to make my own plates.
On, then, to Photopolymer Film, a thin light sensitive film that can be attached to homemade plates and is quite
reasonably priced. Suggestions regarding plates to attach the film to vary from copper through aluminium, none of which I could cut and then get completely flat. Rebecca Vincent, a printmaker
from Northumberland, helped me with the suggestion that Slater’s Plastikard would be OK. She
uses it herself. This is a very hard plastic material that can be cut with a craft knife and remains flat.
I buy my film from two sources: Polymetaal in The Netherlands and Sally Dyas in the Channel
Islands. The films are Z*Acryl and Photec respectively. For anyone starting the process the more forgiving of mistakes is Photec. The Z*Acryl is thinner and needs more care to make a continuous tone image.
Making a Plate
In order to attach the film to a plate an etching press is needed and I made the decision (not lightly!
) to buy one from Polymetaal. It is anchored to a bench by two lengths of the angle steel that is used to put up storage racks, this needs to be done, the upstroke will have the press on the floor if not on
your feet, be careful.
I make my plates from 0.030" Plastikard and to start cut a piece about 1/8" larger than the image
and then go over the surface of it with some fine (400 grit) wet and dry paper in water with some washing up liquid added. This will give a nice key for the film to adhere to.
The film comes on a roll and is wrapped in a light proof bag, it should be opened and used in a dim light that excludes daylight, ideally under the light of one of those yellow bulbs that are used
for electric fires. The film has a protective layer on both sides, to start place the plate on the film and cut round it leaving about 1/4" border. Now remove the backing from the film, this is on the
inner side of the roll, scratch a corner with a finger nail and peel it off carefully. I do this next bit on some clean newspaper, place the plate on the paper and put the film on top peeled side down,
inspect the sandwich for any bits and lumps, remove these carefully.
This bit is quite difficult to describe I hope the picture (Pic 1.) will help somewhat. The film must
be attached to the plate. Going to the etching press, make the following layers, starting on the bed:
1. Paper (I use lining wallpaper)
2. A sheet of Plastikard larger than the plate
3. The film, inner side up
4. The plate, this is lowered gently onto the film
5. A sheet of waste paper, the film border will stick to this
6. The thin blanket.
7. The thick blanket
|
Picture No 1. The etching press with the paper on the bed, a plate on top of that and you can see the thin and thick blankets. You
can also see that in relation to the size of the press the spokes are quite long indicating the amount of pressure needed to make a print and the need to bolt the press to a table.
|
|
When this is done, pull the sandwich through the press with a fair bit of pressure. That is, it should
be quite hard to turn the spokes. Judging pressure will get easier with experience. Remove the layers and inspect the plate: you should see a perfectly smooth surface, no bubbles, no creases or
wrinkles. If you do see bubbles, creases or wrinkles, remove the film from the plate and start again. If it’s OK, carefully cut the plate from the waste paper with a craft knife. Leave the plate in
a dark place for a couple of hours so that the film will adhere to it properly .
The Transparency
The transparency has to be a positive. The way the process works is as follows: the shadows get
less exposure and therefore the film is still quite soft and will etch deeper and take more ink; the highlights get more exposure and etch less and will take less ink. That's why some people call it Intaglio etching.
I use Photoshop, and the technique is quite simple. Turn your image to B & W (I won’t digress into a Photoshop tutorial--if I do the people who use PSP or The Gimp etc will want their
tenpennorth as well!). Adjust the contrast to suit your taste (and your future knowledge of the process) and then using Curves reduce the Output to between 60% and 80% (try 70% first) and leave the Input at 0%. (See pic 2)
 |
|
Picture No 2. An image out of Photoshop and ready for printing onto a transparency sheet. The image has had various
filters and layers applied to it before finally being flattened and the contrast reduced. The registration border was put on last and you can see the denser black.
|
|
All you are doing here is reducing the shadow end to bring the tonal range in line with the film and, once you have got the right setting for your personal taste, you can use it for any image. Ideally,
initial images should contain 0% to 100% white to black, if your image doesn't, alter it in the software.
OK, so now you've got an image that’s the right size for your plate and you should be able to make a plate and get a print off it. Alas, though, the plate will not last very long--the pressure from the
rollers will wear it out in few passes. It is possible to obtain an 'Aquatint' screen with millions of tiny holes in it. This is exposed to the film after the initial exposure and makes a plate that will
hold ink more effectively. It will also enhance its life. Aquatint screens are very expensive though. You will also need a point UV light source for this technique--either the sun or one of those
commercial printer’s UV machines.
If you are of limited means like me, the answer to this difficulty lies within Photoshop. For your
first print, convert the image to a Bitmap and from there add a 'Half Tone Screen'. Your print will be of newspaper quality but this will work first time and there's nothing like success to make you
want to continue. Photoshop has lots of other tricks hidden away in it--you can sprinkle your image with grain or noise or use any one of the myriad filters that are available to wreak all sorts of interesting effects.
Exposing the Plate
You can use the sun for this. Alas, in the UK we don't see that much of it so I had to find another
UV light source. Commercial printers who use those expensive PP plates have point source UV contraptions the size of two office desks. I couldn't afford one of those even if I had the room for it
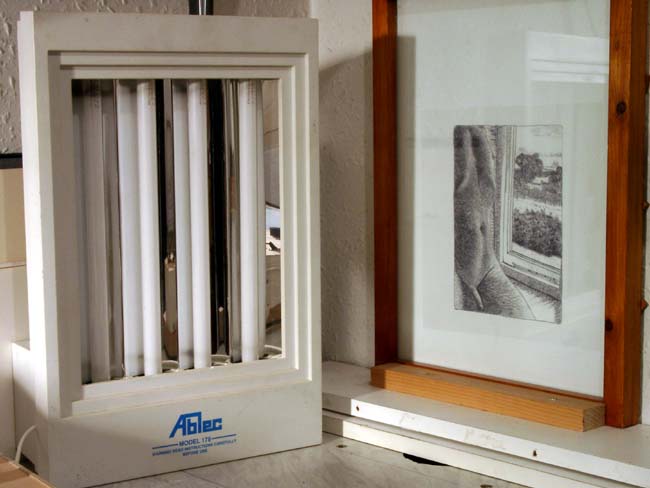
. So off to a car boot sale (they sell them on eBay too) and I found a 'Facial Solarium' (Pic 3) with 4 UV tubes and chrome reflectors behind them, great for Cyanotypes too. Please don't forget that
UV light sources are dangerous, most of these units have instructions printed on them, make sure you follow them.
|
Picture No 3. On the left is the UV light source, four Fluorescent UV tubes with chrome plastic reflectors behind
them. On the right is my homemade contact printing frame. The process is very suited to making prints from drawings--just scan one to make a transparency, sharpen it and reduce the
contrast by a smaller amount than for a photograph.
|
|
I use a homemade printing frame to hold the positive and the plate together, though a piece of board and some glass held together with Bulldog clips will do equally as well. Another sandwich
here, though a simple one: put the transparency emulsion side to the plate and put both into the frame in register. This may take a few attempts but you'll soon come up with a way to do it. I print
a registration border around my images and drop the plate on top.
The frame is then put up vertically 12" away from the UV light source and exposed. I use 32
seconds for the Photec and 45 seconds for the Z*Acryl. At first I used a long lead and manually switched the UV source on and off from outside the room. When I found out the range of times I
needed, I made a timer using a 555 clock timer chip. For those who know about electronics, there are plenty of suitable timer circuits to be found on the web. After the exposure you should be able
to see an image on the plate, fainter on the Z*Acryl than the Photec.
Etching the Plate
Plates are etched in nothing more harmless that washing soda (Sodium Carbonate), 10 grams to 1 litre of water at 18 to 21 degrees Centigrade (65-70° F). Take the
exposed plate and hold a corner of it in the etching bath (I use cat litter trays from the pet shop) for about 15 secs. Take the plate out, dry the corner with some tissue and then rub the end of a finger
across the corner to loosen to top protective layer and peel this off. From here on, hold the plate by the edges only!! You may be allergic to washing soda--if so, wear gloves.
Push the plate, holding the edges only, gently into the bath and make sure it stays at the bottom. Leave it there for 7 minutes for the Photec and 8 minutes for the Z*Acryl. Do not touch it, agitate it
, wipe it with a sponge or anything else.
Still with great care, remove the plate from the etch bath and place into another dry tray. Now the
hardening begins. Prepare a solution of 20 millilitres of white vinegar (Acetic Acid) to 1/2 Litre of water at about 20 degrees C and 1 litre of plain water at the same temperature. Wash your
hands (gloves) now--drips of etch fluid can produce blobs on your plate.
Pour in the dilute vinegar and swish it over the plate gently for a couple of minutes and pour it
away, pour in the plain water and do the same. Still holding the plate by the edges place it on some blotting paper and very gently blot it with some kitchen roll to remove the surplus water. Stand it
somewhere in the dark to dry.
When the plate is completely dry, and not before, harden it further by exposing it to the UV light
source for twice the amount of time it took for the initial exposure. After this the plate will be hard enough to handle and you may touch the surface.
Troubleshooting
If the shadows peel off, the etching time has been too long, the bath too strong or the exposure too
short. If the highlights are not etched enough then the etching has been too short or the exposure too
long. It takes a few experiments to get this right but once you've done it experience will tell you how to expose and etch.
Inking the Plate
This is the messy bit, so be prepared to get your hands covered in ink. I use Rostow & Jungs
'Akua Color Intaglio' waterbased inks, they can be used safely in an unventilated room, are made in the USA and are absolutely superb.
In the summer the ink can be used straight from the pot and spread onto the plate, In the winter however the ink and the plate need to be warmed. I've got one of those hot plates (Pic 4) that beer
and wine makers use--works a treat.
|
Picture No 4. The hot plate (a beer or wine making heater), a sheet from an old telephone directory and a plate
ready for inking up. As the weather gets colder the ink thickens and I warm the plates to begin with and then as winter sets in I warm the ink as well for about 1/2 hour before I
use it.
|
|
Rest the plate on some newspaper or telephone directory paper (very useful and lots of it in a book
), open the ink, stir it with a knife and then wipe the knife over the edge of the pot--don't waste the
ink. Now, with a piece of card (I use matte card cut into 1" strips) take a small amount of ink and spread it fairly firmly over the whole surface of the plate, making sure that it goes into all the
etched holes and grooves.
Having done that, you've now got to remove most of the ink. Take a sheet of the scrap paper and
place it on top of the plate and press it all over with the heel of your hand--not too hard though--and peel it off. This will remove some of the ink.
You will have already bought some thin Nylon material that is fairly coarse but not as coarse as Muslin and inside this you will have placed a cotton dishcloth, then sewn this into a ball (Pic 5).
This is used to wipe more ink off the plate, the idea is this: the Nylon is not very absorbant and will not remove much ink, but a little pressure will allow the dishcloth to absorb some, this way
you can control the removal of the ink.
 |
|
Picture No 5. The hot plate and, on top, the tub of Akua Color Intaglio ink, the double layer wiping cloth and a
card ink spreader made from some matt card.
|
|
The third and last wipe is carried out with more scrap paper and this is just placed on the plate
and gently moved around with your fingertips to remove very small amounts of ink. Your plate is now ready to print. The printing inks are so utterly 'Black' that you can easily be fooled into
thinking you've wiped a plate enough when you haven't. Correct wiping probably removes 90% of the ink.
Printing the Plate
I use Somerset 'Velvet Soft White' paper. It was the first one I tried and I was so pleased with the
results I've never used anything else. It's a nice creamy colour and makes the most gorgeous prints.
The paper must be damp to take the ink. Put some water in a tray and put the paper in, do not press it down with your fingertips--you will get blobs on your print. Swish the water round and
thoroughly wet the paper. Hang it up to drip until damp--about 5 mins for 250 gsm paper. Blot the bottom corner before printing.
Another sandwich on the press is required for this, again starting on the bed:
1. Lining paper
2. The inked plate
3. The damp paper (try to get this square to the plate)
4. Tissue paper (to stop the ink from getting on the blanket)
5. The thin blanket
6. The thick blanket
Pull the print through with slightly less pressure than you used to make the plate and then pull the
blankets back and gently peel the print from the plate. A good sign of the correct pressure is hardly any ink left on the plate.
First pulls are always a bit hit and miss. If it looks reasonable make another print, correcting your
mistakes. Then, if you are going to make an edition, you can print it until you get bored or the plate
wears out. I print mine one at a time. I like to think about the inking of various images and how I will do it the next time.
For someone more concerned with, and more interested in, the technicalities than myself, it would be very rewarding to make multi impression images using several colours and to investigate
making the highest quality images.
It's a great way to make images, the main benefit is not having to be concerned about the toxicity of
the ingredients, most of which can be bought from the local shops. And of course the prints look so good and you know they are going to last for centuries. Happy pulling, as they say.
 |
Return to Articles Page
|