|
In recent years I have taken a greater interest in brown toning, particularly in light of its archival qualities. I have always enjoyed the warm-tone aesthetic,
and think it underrated by a lot of fine art photographers. I find that warm-tone chloride emulsions often reproduce negatives with a much more pleasing tonal scale than their cold-tone counterparts.
Most of the time, however, I’m not really satisfied with the tones I get from chloride emulsions when I tone them in brown toner. I generally prefer to use selenium. But that prejudice did not prevent
me from experimenting with double toning.
I have been printing a lot on Bergger Prestige CM warm tone paper (grade 2). This a premium, high-silver-content paper on an
extra thick double weight stock.
This grade 2 paper seems to be about a half-grade less contrasty than Agfa Portriga grade 2, and has a remarkably long tonal range. But, as is often the case with graded papers, I seem to be
constantly striving to get more separation in one area or another of the scale.
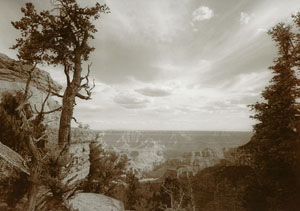
My first test with selenium and brown toner on Bergger Prestige involved a shot of the Grand Canyon that had an
extremely long scale. I wanted plenty of contrast, so I toned the print in selenium, but felt I might have over-done it in the deep shadows, so I wondered if some brown toner would help. Typically, with selenium
toner the print will darken, so one has to compensate by printing with less density and/or contrast; whereas, with brown toner, the print tends to lighten, so one has to print with more density and/or contrast.
 One thing I knew from past experience was that I
needed to wash my prints very thoroughly before I put them in brown toner. If any trace of fix remains in the print, there is a possibility of uneven toning and strange
blotches. So after selenium toning, I always soak my prints in Kodak hypo clearing agent (with agitation) for three minutes, and then wash them for an hour. I got a subtle s One thing I knew from past experience was that I
needed to wash my prints very thoroughly before I put them in brown toner. If any trace of fix remains in the print, there is a possibility of uneven toning and strange
blotches. So after selenium toning, I always soak my prints in Kodak hypo clearing agent (with agitation) for three minutes, and then wash them for an hour. I got a subtle s plit tone with the selenium alone, but after an hour of washing it was somewhat less noticeable. Normally, with brown toner, you want to tone thoroughly in order to
obtain consistent results and avoid occasional uneven toning. But I was intent on seeing if I could get a split tone, and I knew it wouldn’t work if I toned for too long. So I pulled the print after
only 2 minutes in the brown toner. I was amazed at the beautiful, clear split tone I got. Later, I had second thoughts and wondered if the paper would split with brown toner only. The answer was a definite NO. plit tone with the selenium alone, but after an hour of washing it was somewhat less noticeable. Normally, with brown toner, you want to tone thoroughly in order to
obtain consistent results and avoid occasional uneven toning. But I was intent on seeing if I could get a split tone, and I knew it wouldn’t work if I toned for too long. So I pulled the print after
only 2 minutes in the brown toner. I was amazed at the beautiful, clear split tone I got. Later, I had second thoughts and wondered if the paper would split with brown toner only. The answer was a definite NO.
Being a computer nerd, I’m chronic about not reading instructions. After I toned my prints in brown toner I washed them
for two hours. When they came out, the beautiful split had turned to mush. The only thing I could figure was that the brown toner had
continued to tone during the long wash. So I went back and carefully read the instructions for brown toner. Kodak recommends a 1 minute soak in hypo clearing agent after toning. If I had ever
noticed that before, I had ignored it, assuming it was unnecessary. Wrong! Apparently, the change to a more neutral pH, facilitated by the hypo clearing agent, halts the toning action. The hypo
clearing agent cannot be omitted.
I have a tendencey to use my Ansco 130 developer for a month or six weeks, because it lasts for a long time anyway and is very expensive to mix. I often add
carbonate and benzotriazole to revive it when its contrast begins to flag (see Tips on Printing). I have noticed that the older it gets the more likely it is to produce a
warm olive green color, whereas when it is fresh it produces a remarkably neutral print color. This is definitely a factor in the final print color, even after toning in selenium and brown toner.
Considering my past experience with double toning in selenium and gold, I wondered what would happen if I tried to add gold toner to the selenium and brown toner combination. So far I
haven’t achieved what I’m looking for, but there is no apparent problem with gold toning after brown toning. Because the gold toner tends to tone the entire image, I find it extremely difficult to
predict the final result after three toners have been applied.
To sum up: finding the perfect print density is somewhat hit or miss. Sometimes it is best to make 2 or 3 prints at slightly
different exposures because of the difficulty in determining exactly how the print may look after two tonings. The toning in selenium will darken the low values and increase contrast;
however, toning in brown toner will open up the low values somewhat and clear the whites very nicely. Time in the selenium toner is not critical--I usually stay in the 2-4 minute range, with
the toner diluted 1:15. Then I give the print 3 minutes, with agitation, in hypo clearing agent, and a one-hour wash.
 After the long wash, brown toning goes very quickly. The
longer the print stays in the brown toner, the more pronounced the brown tone will become. The longer the print stays in the wash after brown toning, prior to the
hypo clearing agent, the more coppery brown it will become: the toning action continues, almost imperceptibly, until it is halted by the hypo clearing agent bath. Although the copper-brown effect is
interesting, I prefer a more muted brown, as in the scene from Puerto Vallarta. The procedure I favor to obtain the more muted
brown is only one minute in brown toner with continuous agitation, a quick dip in the wash bath, and a full minute in hypo clearing agent with agitation. After the long wash, brown toning goes very quickly. The
longer the print stays in the brown toner, the more pronounced the brown tone will become. The longer the print stays in the wash after brown toning, prior to the
hypo clearing agent, the more coppery brown it will become: the toning action continues, almost imperceptibly, until it is halted by the hypo clearing agent bath. Although the copper-brown effect is
interesting, I prefer a more muted brown, as in the scene from Puerto Vallarta. The procedure I favor to obtain the more muted
brown is only one minute in brown toner with continuous agitation, a quick dip in the wash bath, and a full minute in hypo clearing agent with agitation.
Step by step double toning:
1. 2 to 4 minutes in selenium toner (1:15) with continuous agitation.
2. 3 minute wash.
3. 3 minutes in hypo clearing agent with continuous agitation.
4. 1 hour wash in archival print washer.
5. 1 or 2 minutes in brown toner.
6. 30 seconds to 5 minutes in wash (depending on color desired).
7. 1 minute in hypo clearing agent with continuous agitation.
8. 3 minutes in print hardening solution with continuous agitation.
9. 30 minute final wash in archival print washer.
|

