|
Negatives for Carbon Printing
 Carbon printing is quite flexible and changing the strength of the dichromate sensitizer allows for the use of negatives
with widely varying density ranges, from as low as log 0.9 to as high as log 2.7 and even higher. In my experience, however, the best negatives for carbon are those with a
high density range which maximize the very long scale and straight-line characteristics of the carbon process. This type of negative also maximizes the relief potential of the
medium when combined with the right type of tissue. The optimum negative will have a DR of about 1.8 (with a range from about .30 to 2.10) and exposure
should be sufficient to get as much shadow detail as possible off the toe and into the straight line of the film’s characteristic curve. As a general rule negatives for carbon printing exposed under
normal lighting conditions should be developed about 1.5 times as long as would be required for silver negatives exposed under similar lighting conditions. Since increased development times
also increases shadow density the EFS (effective film speed) of the film should also be increased slightly, generally about one-fourth to one-half over the manufacturer’s ISO rating of the film. Carbon printing is quite flexible and changing the strength of the dichromate sensitizer allows for the use of negatives
with widely varying density ranges, from as low as log 0.9 to as high as log 2.7 and even higher. In my experience, however, the best negatives for carbon are those with a
high density range which maximize the very long scale and straight-line characteristics of the carbon process. This type of negative also maximizes the relief potential of the
medium when combined with the right type of tissue. The optimum negative will have a DR of about 1.8 (with a range from about .30 to 2.10) and exposure
should be sufficient to get as much shadow detail as possible off the toe and into the straight line of the film’s characteristic curve. As a general rule negatives for carbon printing exposed under
normal lighting conditions should be developed about 1.5 times as long as would be required for silver negatives exposed under similar lighting conditions. Since increased development times
also increases shadow density the EFS (effective film speed) of the film should also be increased slightly, generally about one-fourth to one-half over the manufacturer’s ISO rating of the film.
Much of my present work is with digital negatives. The use of digital negatives allows one to standarize procedures and can greatly increase productivity. In making digital negatives I use Mark Nelson’s Precision Digital Negative system and print on Pictorico OHP with an Epson 2200
printer. The quality of my work with digital negatives closely approximates the quality I get from in-camera negatives.
Exposing the Sensitized Tissue
Carbon tissue sensitized with dichromate has its maximum sensitivity in the UV and violet at about 350-420 nm. Its sensitivity extends through the blue but falls off very rapidly in the green to about
515nm. It has virtually no sensitivity to orange and red light. In practice carbon tissue is exposed with a source rich in UV light, such as the sun, mercury vapor or metal halide lamps, banks of BL
(black-light) fluorescent tubes, and carbon arc, metal halide, pulsed xenon and continuous wave xenon plate burners made for the graphic arts. Each system has its advantages and disadvantages,
but when used properly all are capable of good results. For the handy, there are a number of relatively inexpensive artificial light sources that can be put together or assembled from materials
available at your local garden and home supply store. Consult the references for more information.
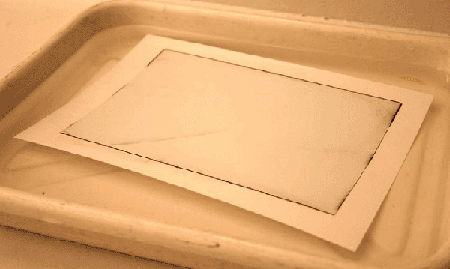
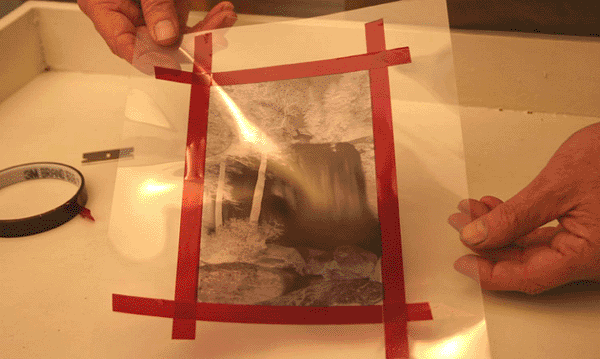
Sensitized carbon tissue should be exposed with a contact printing frame capable of exerting very firm pressure, or better, with a vacuum easel. The dry tissue can be very stiff and requires a lot of
pressure to maintain good contact with the negative. Mask around the edges of the negative with lithographic tape to create a safe edge of about 1/4”. Failure to mask the negative may result in
frilling during warm-water development.
 |
|
|
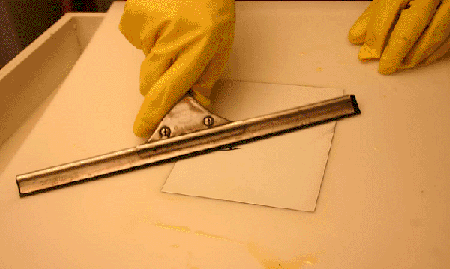
Figure 12 - Masking the negative with a safe-edge.
(Image courtesy of Sam Wang)
|
|
If the final image is to be made with the single transfer process the negative should be reversed for correct orientation of the final image. To reverse the negative, just sandwich it with its base side in
contact with the emulsion. In double transfer the final orientation of the print will be correct if the emulsion of the negative is placed in contact with the emulsion of the tissue. If it is necessary to
reverse the negative some loss of sharpness should be anticipated, greater with a diffuse light source such as a bank of UV tubes, least with semi-collimated and point-light sources.
Exposure times in carbon printing will vary significantly according to tissue type and light source. I expose carbon with two different light sources, a UV bank of twelve 48” BL fluorescent tubes
spaced at about 4” from the printing frame, and an AmerGraph ULF-28 Continuous Wave Xenon light source. Under these conditions, typical printing times for well-exposed and developed
negatives range from about three to fifteen minutes, with the major variable being the tissue itself. The AmerGraph ULF-28 prints on average slightly more than twice as fast as the bank of BL tubes.
Transfer to Final or Temporary Support for Development
After exposure the carbon tissue must be transferred to a final or temporary support for development in warm water. The support on which the carbon image is developed must be
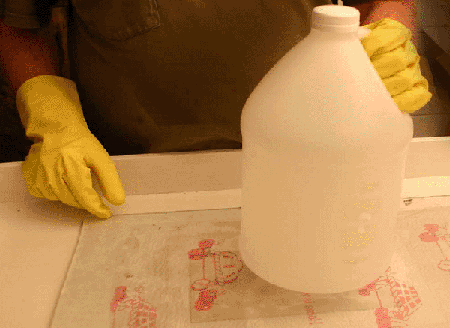
somewhat larger than the tissue. Paper supports should be soaked for a minute or so in a tray of water at about 60-65°F before mating with the sensitized and exposed tissue. After exposure, place
the carbon tissue in the tray of cool water, along with the final or temporary support, and allow it to soak for about a minute. The tissue should be brought into contact under water with the final or
temporary support, then the sandwich is removed from the water and allowed to drain for a few seconds. Place the sandwich on a sheet of plate glass, tissue uppermost, and squeegee out the
excess water, applying gradually increasing pressure with the squeegee. Blot off the water from around the edges, place the sandwich on a sheet of clean blotting paper, cover with a sheet of plate
glass and let stand under pressure for about 20-30 minutes.
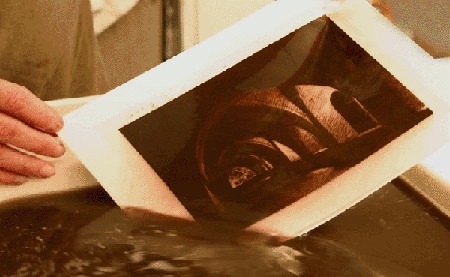
Warm Water Development of the Carbon Image
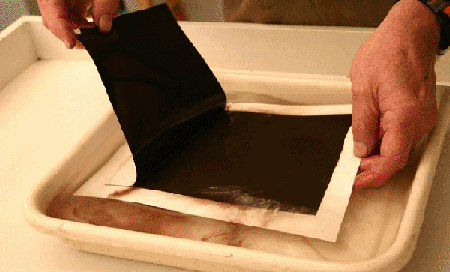
The next step is development in warm water. Transfer the tissue/support sandwich to a tray of warm water at about 110-120°F. In a minute or so the soluble gelatin will begin to melt and start
to ooze out at the edges of the tissue. You should now strip the tissue from the support: starting at one corner, lift the tissue and gently pull it off the support with an upward motion. Discard the tissue.
At this point you will not see an image but a mass of melting, oozing pigment. To clear the image agitate it in the warm water with a gentle rocking and shaking motion, occasionally lifting it from
the water to drain for a few seconds. After about 4 minutes most of the insoluble gelatin will have washed away and you will have a good view of the image.
Continue to agitate as before, lifting the print from time to time to drain. The print should be fully developed in 6-10 minutes, at which point the drain water should be clear.
There is no precise ending point to development with carbon printing so if the print is too dark after 6-10 minutes continue development in the warm water until it looks right to the eye. With
extended development of 30-60 minutes it is possible to further reduce the density of the print by as much as 1/2 to one full stop.
Carbon prints have some dry down, though relatively speaking not nearly as much as Pt./Pd. Therefore, continue development until the highlights are just a bit lighter than they should appear
on the final print.
After development is judged complete transfer the print to a tray of cool water (50-60°F.) and continue agitation for a minute or so, lifting it out of the water several times to drain. Leave the
print in the cool water for 2-4 minutes to allow the gelatin to set, then hang it up to dry.
Veiled margins and other pigmented gelatin residue left around the borders of the print may be removed from the print by carefully rubbing these areas with a clean sponge.
Clearing the Print
 Prints developed on a final paper support will have an overall yellow stain from the dichromate sensitizer. To
remove this stain, soak the print in a 3% solution of sodium bisulfite or potassium metabisulfite for 5-10 minutes, or until the dichromate stain clears. Always allow the print to
dry before clearing because the relief image, which is extremely delicate following development, is further softened by the clearing agents, and blistering or
reticulation of the image is possible. After clearing, rinse the print in running water at 60-70°F. for 5-10 minutes. The print is now chemically stable and
ready to be mounted for presentation, unless some retouching is required. Prints developed on a final paper support will have an overall yellow stain from the dichromate sensitizer. To
remove this stain, soak the print in a 3% solution of sodium bisulfite or potassium metabisulfite for 5-10 minutes, or until the dichromate stain clears. Always allow the print to
dry before clearing because the relief image, which is extremely delicate following development, is further softened by the clearing agents, and blistering or
reticulation of the image is possible. After clearing, rinse the print in running water at 60-70°F. for 5-10 minutes. The print is now chemically stable and
ready to be mounted for presentation, unless some retouching is required.
Carbon reliefs developed on plastic with the double transfer do not require clearing as the dichromate has no way of leeching into the plastic support.
Transfer of the Image from Temporary to Final Support
When printing with the double transfer procedure we must transfer the relief on its temporary plastic support to a final support. The most reliable support for the double transfer procedures is a
paper support sized with a layer of relatively soft gelatin, as previously described. To make the transfer, first soak the final paper in water at about 65-70°F for 5-10 minutes. When the gelatin has
swollen, which will be recognized by a soft, slimy feel to the paper, it is time to make the transfer. Now, soak the image on its plastic temporary carrier for 30-45 seconds in the same tray of water,
then bring the two into contact under water. Transfer the sandwich to a flat surface, paper support uppermost and gently squeegee the back of the paper support to remove all water. Place blotting
paper or a clean towel over the paper and cover it with a sheet of plate glass. After about 10-15 minutes remove the sandwich and place it on a drying rack, or hang it to dry. Depending will take
several hours, or with heavy final support papers, even overnight. When dry the paper, which now carries the image, should peel easily from the plastic. In fact, it may do this on its own as it
dries. If all has gone well there should have been a complete transfer of the image from the temporary plastic support to the final paper support. You should re-soak the image in cool water
for 5-10 minutes to remove the gloss, then hang to dry.
 Final Finishing Final Finishing
The thick gelatin layer of carbon photographs can cause heavy curling and wrinkling of the print. A dry mount press can be used to flatten out the print. To flatten, warm up the dry mount press to about 180
-200° F and place the print in the press between two sheets of clean board and leave for 1-2 minutes. Remove the print from the press and place it under pressure for 20-30 minutes to cool and then store it flat
under light pressure. Another solution is to just place the print between two flat surfaces for a week or so, with light pressure applied with some type of weight.
Retouching Prints
If any retouching is needed I recommend the use of tube watercolors. Tube watercolors are available in a wide range of colors and unless you are using a very unusual color it should not be
difficult to match the color of the tissue.
Some Common Faults and Their Remedies
Most problems in carbon printing can be traced and corrected without great difficulty. Good record keeping is a great asset in figuring out what went wrong.
- Tissue is so stiff and curled that it is impossible to maintain good contact with the negative.
Cause: This results from prolonged drying of the tissue in conditions of low humidity.
Solution: Once the tissue has dried store it flat under pressure until it is time to expose.
- Negative will not separate from the tissue after exposure.
Cause: The tissue was not sufficiently dry or a bit of water splashed on either the tissue or the
negative before they were placed together in the printing frame. This is a very serious situation that may result in damage to the negative.
Solution: Do not use the tissue until it is completely dry, and avoid splashing water around the tissue and negative. Further, I recommend the use of a thin sheet of protective Mylar
between the tissue and negative during exposure.
- The image floats off or frills during warm water development.
Cause: The most likely cause is that the paper support or the tissue (or both) absorbed too
much water before being squeegeed together
Solution: Reduce soaking time of the tissue and the paper support to about a minute and keep the soak water at 60-68°F or lower.
- It is impossible to separate the tissue from the transfer support during warm water development.
Cause: The most common cause is gross overexposure of the tissue, which results in
hardening the gelatin all the way to the base of the support.
Solution: Expose the tissue for the correct amount of time.
- Most or all of the pigmented/ gelatin relief washes off the support during warm water development.
Cause: The tissue was underexposed, or perhaps received no exposure at all.
Solution: Expose the tissue for the proper amount of time.
- The image frills around the edges during development.
Cause: There are several possible causes. The most likely cause is that the negative was not
masked to provide an adequate safe edge. Frilling can also be caused by inadequate blotting of the tissue/support sandwich around the edges. It can also result from the tissue and support
being left in contact for an inadequate amount of time and the gelatin does not dry out enough to establish good adhesive contact with the support.
Solution: Mask the negative to provide a safe edge, blot up all excess moisture from around the edges of the tissue and leave the tissue/support sandwich under pressure for more time.
 The image is too dark. The image is too dark.
Cause: The image was overexposed or the sensitizer was diluted too much.
Solution: Reduce exposure.- The image is too light.
Cause: The image was underexposed.
Solution: Expose longer.
- The image is too contrasty.
Cause: The sensitizer was too weak.
Solution: Use a stronger sensitizer.
- The image is too flat.
Cause: The sensitizer was too strong.
Solution: Use a more diluted sensitizer.
- Small irregular blisters on the final image.
Cause: Air under pressure in the water is trapped between the tissue and the support. During
warm water development the air bells expand, causing small bubbles to develop.
Solution: Prepare the transfer water well in advance to allow for the dissipation of air under pressure.
- Shiny specks on the print.
Cause: Shiny specks are caused by slight irregularities in the gelatin sizing of the final support.
Solution: Apply a thinner gelatin coating, or decrease the gelatin percentage in the solution, or add a small amount of starch to the sizing solution to cut the gloss.
- The final image has a yellow stain.
Cause: The yellow stain is most likely residual dichromate from the sensitizer.
Solution: Carbon prints made by the single transfer process should be cleared by soaking in a clearing bath such as sodium bisulfite or potassium metabisulfite, followed by a wash of several minutes in running water.
- The final image contains streaks.
Cause: In the home manufacture of tissue one will find that certain pigments, most notably
some varieties of lampblack, can cause slight streaking on the face of the tissue. This apparently results from a small residue of oil in the pigment. If this problem occurs, eliminate
the guilty pigment. The problem can also result from inadequate dispersion of the pigments within the gelatin solution.
Solution: Disperse the pigment thoroughly in the gelatin solution and eliminate the pigment(s)
causing the problem. Always strain the pigmented/gelatin solution before coating.
|
PHOTOGRAPHIC CREDITS
The photograhs used in this article, other than those of the author, were provided by Mike Robison and Sam Wang.
REFERENCES
Consult the following sources for more information about carbon printing.
King, Sandy. “Making Carbon Tissue for Photogravure Printing,” in Copperplate Photogravure,
David Morrish, New York: Amphoto Press, 2003.
King, Sandy. The Book of Carbon and Carbro: Contemporary Procedures for Pigment Printmaking. Greenville, SC: Permanent Light Systems,
2002.
King, Sandy. “Pigment Printing with the Carbon Process, Part II,” Photovision, November/December 2001, 48-52.
King, Sandy. “Carbon Printing, Part
I,” Photovision, September/October 2001, 42-47.
King, Sandy. “Monochrome Carbon,” in Coming into Focus. San Francisco: Chronicle Press, 2000.
87-105.
King, Sandy. “Ultraviolt Light Sources for Printing with Alternative Processes,” at https://unblinkingeye.com/Articles/Light/light.html
Marton,
A. M. A New Treatise on The Modern Methods of Carbon Printing. Bloomington, Illinois, 1905.
Nadeau, Luis. Modern Carbon Printing. Fredericton: Atelier Luis Nadeau, 1986.
Farber, Richard. Historic Photographic Processes. New York: Allworth Press, 1998. 119-49.
Sandquist, Michael. “Carbon Printing.” View Camera Nov. /Dec. 1990:4-11.
WORKSHOPS ON CARBON PRINTING
Carbon printing workshops are sponsored by Photographers’ Formulary in Condon, Montana, as part of Workshops in Montana, a series of workshops on the alternative processes. In 2007 Sandy
King is scheduled to teach a carbon work June 10-15. See http://www.workshopsinmt.com/ for more details about the Formulary Workshops in Montana.
The author of this article also conducts one-on-one workshops. For details contact Sandy King at sanking@clemson.edu.
SUPPLIERS OF CHEMICALS, PAPERS AND PIGMENTS USED IN CARBON PRINTING
ABOUT THE AUTHOR: Sandy King has printed with the carbon process since the early 1980s, first in tri-color carbon and carbro, and more recently, exclusively in monochrome . He is
widely recognized as one of the current masters of carbon printing and has taught numerous group and one-on-one-one workshops on carbon printing both in the US and abroad.
Sandy focuses on alternative printing processes and has numerous publications on the subject, including articles on carbon in Coming into Focus, Photo Vision and View Camera
magazine, and on kallitype , pyro staining developers and UV light sources in on-line photography journals such as https://www.unblinkingeye.com and http://www.alternativephotography.com. He has a monograph on carbon printing, The Book of Carbon and Carbro:
Contemporary Procedures for Pigment Printmaking. Greenville, SC: Permanent Light Systems, 1999, 2nd edition 2002. Sandy has also experimented with developer formulation and his technical
article on pyro staining developers, “An Introduction to Pyro Staining Developers”, originally published in English at https://www.unblinkingeye.com,
has been translated and published in on-line journals in the French and Russian languages.
Sandy is a landscape photographer who works primarily with large format and ultra large format equipment and prints almost exclusively with alternative printing processes, primarily
carbon but also with kallitype and pt./pd. In 2006 his work was shown at the APUG conference in Toronto (May), at the IFSAK Biennale in Istanbul,. Turkey, (October), and at Elevator Digital
in Toronto (December). He is a member of the Contact Printer's Guild and his work can be purchased through the site. http://www.sandykingphotography.com/.
|
|
|
|