|
Tri-Color Gum with Cyanotype
by Sam Wang
Gum or gum-bichromate printing is a very flexible process capable of producing very beautiful and permanent prints. Although volume upon volumes have already been written on the process, few contain
information that readers can follow to obtain repeatable results. This is partly because we generally do not work in scientifically monitored environments and often have no real control on the great number of variables. Each of
us then needs to develop techniques based on what works for him or for her. This article is a quick run-through on what has worked for me.
My tri-color gum process may be different from others’ in three areas:
1/ Digitally created color-separation negatives,
2/ homemade gum, and
3/ the use of cyanotype for one of the colors.
These contribute to the success of my prints, as well as to their distinctive “look.” This look may not be suitable for anyone else. What follows are some details that more seasoned alt-process
printers may find useful, but are by no means a fail-proof step by step guide.
|
Please be aware that all chemicals need to be handled with care. Ammonium dichromate is a very toxic substance and a known carcinogen. Do not ingest, breath, or have
skin contact with it, and do not allow the dichromate in dry form to come near flames, as it is also combustible.
|
|
|
First, a couple words on my imagery: from way back I’ve been interested in intermixing scenes from different times and places to suggest something beyond the surfaces and the obvious. I leave
the simple straightforward and confrontational approaches to the traditional silver prints that I continue to make. With digital images, I can freely manipulate and use subjective colors, colors
that don’t have to be perfect or correct. A great variety of methods are on hand to connect and interlace images in the digital arena, much superior to physically cutting and taping pieces of
Kodalith films together as I once did for photo-silkscreen. Other than that, I do not hold any central theme or philosophy with my imagery, except that there be a hint of ties to photographic reality and
that each is a new vehicle for discovery.
DIGITAL COLOR SEPARATION NEGATIVES
When I’m satisfied with an image on the computer screen, I take the following Photoshop steps to color-separate it into 3 separate full size greyscale negatives:
1. Invert (Image -> Adjustments -> Invert) and then flip the image horizontally (Image -> Rotate Canvas -> Flip Canvas Horizontal).
2. Increase Canvas size on one side to allow room to put in the letters “CYM” (Image -> Canvas Size).
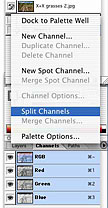 3. Split Channels - separating the RGB file into 3 distinct grayscale documents. 3. Split Channels - separating the RGB file into 3 distinct grayscale documents.
4. On each of these documents, erase 2 of the letters, leaving one to show the printer
color, i.e. on the Red generated file, erase “Y” and “M”, leaving “C” for cyan (cyan
is the complementary color to red); on the Green generated file, erase “C” and “Y”,
leaving “M”; and on the Blue generated file, erase “C” and “M”, leaving “Y”.
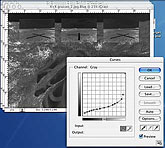
5. Adjust and apply the proper curve for the particular printing process, i.e. gum
(cyanotype in this case can use the same curve). This curve was developed by trial and error. (To get a “ballpark” curve, try printing a black to white gradient on
transparency material and test print it in cyanotype. Keep adjusting and saving and refining the curve untill the tonal range in the cyanotype matches that of the screen. It’s a tedious
process. Mark Nelson’s promised software should make this much easier and more accurate.)
 6. Print on the proper transparency material. Using black ink only, I usually print on the readily available (and cheaper) overhead transparency material
for inkjet instead of the premium quality variety from Pictorico. Printing on Pictorico OHP with color inks obviously would also work and may alleviate some problems such as banding that sometimes occur. 6. Print on the proper transparency material. Using black ink only, I usually print on the readily available (and cheaper) overhead transparency material
for inkjet instead of the premium quality variety from Pictorico. Printing on Pictorico OHP with color inks obviously would also work and may alleviate some problems such as banding that sometimes occur.
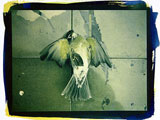
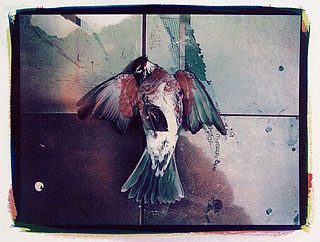
The density range I usually aim for is about log 1.0. However, one of my “more successful” prints, one of a dead bird, was made from negatives printed in color inks on an
HP printer with a much higher density range. So when I say, “I don’t know” in answer to the
question, “What’s the negative density range for gum or cyanotype?” I’m not putting anyone on. It appears that anytime I felt I found some sure way to do one thing, something else would happen to
remind me that I don’t know it all.
I encountered many difficulties when I first began making gum prints: it was not clear which paper to use; my exposing light (a sun lamp) was highly inadequate; plus a myriad of other problems. I
was also using panchromatic film, making “in-camera” separations, holding RGB filters in front of the camera lens for three exposures onto 3 separate pieces of black and white film. I also made
color separation negatives from color transparencies by enlarging in the darkroom. Both of these methods were not only tedious but often produced negatives very difficult to print - densities and
contrasts that were hard to control and working in the dark with panchromatic film was definitely not fun. The fact that I got a few halfway decent prints is something of a small miracle, and
represents hundreds of hours of frustrating work! Digital negatives by comparison greatly simplify the process. Nowadays I use color images from digital cameras as well as scans from slides, and
the negatives print much more predictably.
CYANOTYPE
When I first began using cyanotype as a color with gum, it was because tri-color gum and tri-color casein were causing many problems: one was staining, and another was the graininess/ mottling
that appeared after a few coats of gum. Working with the cyanotype/gum combination not only eliminated these problems, but it also made registration much easier, and resulted in images with
more clarity and apparent sharpness – qualities nice to have when I wanted them.
Many well-sized papers work well with gum printing. For many years I used Rives Heavyweight,
a nice paper but also very soft – it abrades easily and with more than a couple layers of gum you begin to get a grainy effect. Some folks may find this grainy look desirable but not me. Watercolor
papers seem to do better. Paper choice also affects the cyan layer a lot, as each paper will give a different blue, bluish green, or royal blue after a layer of gum is laid on it. The paper is not
additionally sized (watercolor papers are already well-sized) but soaked in hot water for about an hour to pre-shrink, and allowed to dry thoroughly before use. Watercolor papers I have found to
work well include Fabriano UNO and Fabriano 50.
I use the traditional cyanotype formula (“classic” solution A: 50 g ferric ammonium citrate to 250
cc water; solution B: 25 g potassium ferricyanide to 250 cc water). To print the cyan layer with the “C” negative, the one from the Red channel, I use 2 parts A with 1 part B of the stock solutions for
increased printing speed. I also add a little vinegar to the first wash, or soak, to further increase speed and to smooth out the highlight tonality. A word of caution: the addition of vinegar to the
wash water will also cause some of the blue to float and it will reattach to the tray and everything else. To minimize the problem, use a fresh bath of vinegar with water for each print. In addition,
the print needs to be immersed in it in one smooth motion or edge lines could form. The cyan layer is “developed” for only as long as it is necessary to be free of the yellow unexposed emulsion. In
most cases this takes no more than a couple of minutes.
 |
GUM
I prefer to mix my own gum by dissolving gum-arabic powder or granules in water, at 1 part gum to 2 parts water. After it’s all dissolved I add a few drops of 100% thymol (10 grams thymol in 10
cc of isopropyl alcohol) to preserve the solution. I find this gum to “develop” cleanly and in less time than the graphic arts product often called Gum-14, which can vary a lot from batch to batch
and often contains too much preservative to develop (re-dissolve) quickly.
YELLOW LAYER
Prepare a gum solution and add yellow pigment. The homemade gum is diluted 1:1 with water.
Then yellow pigment, usually Hansa Yellow, is added, mixed well, and test-brushed till the color depth is about right. Once it looks about right I add the sensitizer, ammonium dichromate. I use a
homemade scoop to measure, and stir it in with a soft brush till completely dissolved. The scoop is made from a narrow piece of 1/4” thick acrylic: drill a 1/4” hole and block one end of it and
you have a scoop to measure out enough dichromate (about 0.3 g) for 10 cc of gum-pigment mixture. This is close to the minimum amount necessary to sensitize gum without much speed loss.
It is also slightly higher contrast and fits negatives with density range of approximately log 1.0, roughly similar to that of a normal enlarging negative. Adding more dichromate will increase
speed a little and will print a log 1.25 negative, but that also means dumping more of the toxic chemicals down the sewer line. This method allows me to visually evaluate the amount of pigment
I need, without being influenced by the strong yellow of the dichromate. It also helps keep the dichromate to gum ratio constant. The scoop and my particular dichromate to colloid ratio came
from Franklin Enos, a master of the casein process who got me seriously interested in alternative processes back in the late Seventies.
EMULSION COATING
I use a Korean-made HAKE brush for coating. Soft and springy, it does not abrade the paper as a foam brush may. Cheap Hake brushes tend to shed a lot and may go limp when wet. I coat under
normal room lights (tungsten). The gum emulsion is brushed on quickly and left to dry for a few minutes and then the paper is hung in the dark to dry. I let it dry thoroughly because the slightly
damp paper will not only adhere to the negative but the dichromate can also bleach silver emulsions! Drying should take not more than 20 minutes or so in an air-conditioned space, and it may be accelerated with a fan.
EXPOSURE
When dry, the print is placed emulsion to emulsion in contact with the “Y” negative on a light table
, registered by eye, and affixed with short lengths of removable tape. Place the combination in a contact printing frame or the vacuum bed of a “plate burner” and expose for an appropriate time
under UV lights - using test strips to determine proper amount of exposure.
DEVELOPMENT
Place the exposed print in a tray of slightly warm water - about 85 º F - for a minute or two. Then
transfer to a second tray filled with room temperature water (70 to 80 º F). Leave it floating faced down for about 5 to 10 minutes, then check to see how it’s developing. There is a lot of leeway at
this point - unless the print is grossly over or under-exposed, development is usually complete in about 10 minutes. When development is judged to be complete I give the print a quick rinse in cold
water and hang it up to dry. At this point a minute amount of pigment will still run off the image, which I generally do not try to prevent since it is part of the process. If that were not acceptable, I
would give it more exposure and longer development.
 |
RED (MAGENTA) GUM
The magenta layer is made with the negative marked “M,” generated from the Green channel of the
RGB. A variety of different red or magenta colors can be used. The gum mixture is the same as with the yellow. After printing this magenta layer it is possible, actually highly probable, that the
color balance will be off and another printing of one of the colors would be necessary. Another printing may also be necessary for increased colors depth.
 |
HOW I GOT STARTED
It was Phil Davis who first suggested combining cyanotype with gum. Apparently records of this
kind of this combination can be traced back to the early years of the 20th century though I have never seen any of the prints - actually I have hardly ever seen any historical tri-color gum. After
my initial experience of using cyanotype with gum sometime around 1990, the advantages were so obvious that I have been using this combination ever since. Phil also convinced me to mix my own
gum, and introduced me to the concept of 2-color separation. Additionally, I learned BTZS system (Beyond The Zone System) from Phil, and this made me understand the whole business of
sensitometry, the relationships between exposure, development, density, and contrast--a tremendous shot in the arm for both my silver work as well as the alt processes. (And it was Phil
who introduced me to Franklin Enos, who did so much before his death in the mid-Eighties in getting me started with casein and gum, and Sandy King with carbon.)
WHAT ELSE DO I DO DIFFERENTLY & WHY
For single-coat processes I have never found it necessary to size the paper beforehand. At one time I did size papers for printing tri-color gum and tri-color casein but the process of sizing and
hardening can be both messy and time consuming! One of the beautiful things about using cyanotype in tri-color gum is that the paper needs no additional sizing. (Did I hear a chorus of “Hallelujah”?)
I always wondered why people do things that are not really necessary just because some “authority” told them to do so. I usually prefer stumbling along on my own instead of doing a lot of
reading or research on others’ working methods. Only after some experience would I compare my experience with those from others. My methods consequently may be very different from those of
the “gurus” but they have worked fine for me. And to me, the goal in making gum prints, or anything else, is absolutely not to just produce great- looking prints. The prints are but by-products of our
search for technical and aesthetic answers, and not ends in themselves. If I were able to spell out the exact foolproof methods of making tricolor gum prints, what would be left? Cibachrome
(Ilfochrome) is bright, colorful and permanent, and not hard to do at all in a closet darkroom, and it comes as a kit with foolproof instructions. But can anyone imagine making Cibachrome prints and showing them off at APIS?
There is just no one-size-fits-all way to make gum prints. I believe that the variables are too numerous for anyone to lay out a failsafe method. In fact, I’m convinced that I have just scratched
the surface in terms of the potentials of this medium. Not infrequently as I go through my reject piles wondering which ones I ought to discard, the prints I rejected earlier because of some
perceived technical flaws may present themselves on second consideration as beautiful, fresh, and worth keeping! What that means is that great technical command is not easy, nor absolutely
necessary to make good images. Having fun doing it is crucial: “fun” in this sense is synonymous to the exhilaration of being able to ride the bicycle for the first time without falling – WOW, I’ve
gained new ability and new insight! I’m addicted!
|
Sam Wang teaches photography and art with computer at Clemson University in South Carolina. He received an MFA in photography from the University of Iowa in 1966. Holding
the title of Alumni Distinguished Professor of Art, he also helped initiate the MFA-DPA program (Master of Fine Arts in Digital Production Arts), an interdisciplinary program between the
computer science, performing arts, and visual arts departments that prepares students for the film animation industry.
A Gallery of Tri-Color Prints by Sam Wang
|
|
|
|


