 |
||||||||||||||||||||||||||||||||||||||||||||||||||||||||||||||||||||||||||||||||||||||||||||||||||||||||||||||||||||||||||||||||||||||||||||||||||||||||||||||||||||||||||||||||||||||||||||||||||||||||||||||||||||||||||||||||||||||||||||||||
|
The High Standard G .380 Pistol
Historical Background Carl Gustave “Gus” Swebelius immigrated to the United States from Sweden at the age of 17 in 1896. The son of a watchmaker, Swebelius went to work for the Marlin Firearms company in New Haven, Connecticut. He started out drilling barrels and advanced rapidly to department head and then designer. He worked on machine gun design during World War I and is said to have worked with John M. Browning on modifications to some of his designs. After the war he worked again for Marlin, and later for Winchester, as a designer. He founded his own company in 1926, in partnership with Gustave A. Beck, called the High Standard Manufacturing company Inc, to make drilling equipment. In 1932 he partnered with Beck and three other investors to buy the Hartford Arms Company, which manufactured a .22 target pistol. The Hartford Arms Model 1925 target pistol eventually became the High Standard Model B. Swebelius continued working for Winchester until 1939, when High Standard began to require his full-time attention. The Origin of the High Standard Design
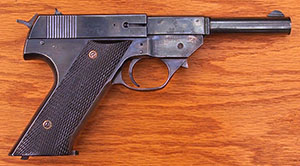
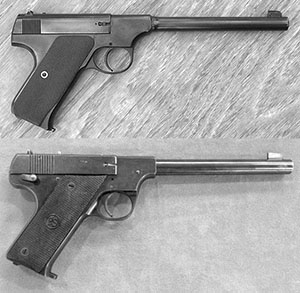
Both guns have pivoting triggers, with an upward projection on the trigger that pulls the transfer bar forward, engaging the sear to fire the gun. Both guns have internal hammers. Both guns have side plates on the left that cover the transfer bar. Both guns have recoil springs built into the slide, and a button on top of the slide to lock the recoil spring in a retracted state. Both guns have short extractors on the right side. Both guns have an unlocked breech, fixed barrels, and slides that must be removed from the rear. The magazine of both guns has a protrusion on the right side allowing the follower to be pulled down to facilitate loading. The Colt’s trigger is tensioned by a small coil spring, whereas the Hartford/High Standard is tensioned by a spring and plunger that act against the upper projection of the trigger. Interestingly, however, Browning’s original patent shows a spring and plunger design to tension the trigger which was apparently not used in the production Colts. The Colt has a cleverly designed backstrap that can be removed (without tools) to release the slide (the top of the backstrap serves as the slide stop), whereas the Hartford/High Standard has a release lever in the frame which depresses an upright lever (tensioned by a spring and plunger) which serves as the backstop. At some point, the High Standard Model B’s backstop was redesigned to strengthen it, and the release lever location was moved from left to right. All future High Standard automatic pistols continued to use a nearly identical design. Every High Standard pistol ever made for commercial sale has an unlocked breech mechanism (i.e., was “blowback” operated). The Model C was identical to the slim-barreled Model B except chambered for the .22 Short. Production began 1 December 1936. The Model A was like the Model B, but had its grip length extended so the bottom of the grip was parallel with the top of the slide. This required a redesign of the magazine, but otherwise the majority of internal parts were interchangeable with those in the Model B. The first Model A was shipped 9 April 1938. The Model A was discontinued in 1942. The Model D shared the larger frame of the Model A, but had a heavier (medium weight) barrel. The first Model D was shipped 22 April 1938. It was discontinued in 1942. The Model E shared the larger frame of the Models A and D, but had the heaviest barrel of the three. As Charles E. Petty points out, today it would be called a ‘bull’ barrel. The Model E was the deluxe model and came with checkered walnut grips with a thumb rest. Production began 18 May 1938 and, like the Models A and D, the Model E was discontinued in 1942. The reason that the Models A, D, and E were all eliminated in 1942 is that they had been superceded by the external hammer H models, which were introduced in 1940, plus the U.S. had entered World War II and gun steel was at a premium. During World War II High Standard became the major supplier of target pistols to the U.S. military, which used them for training recruits. Apparently, the entire output of the company went to the military after the U.S. entered the war.
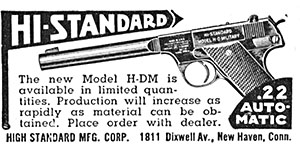
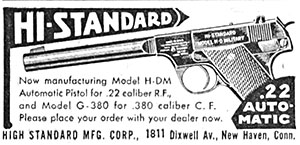
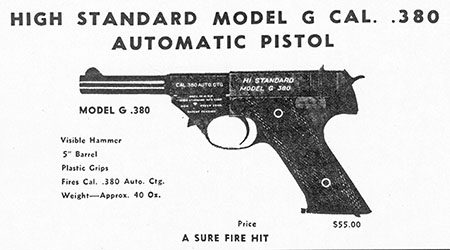
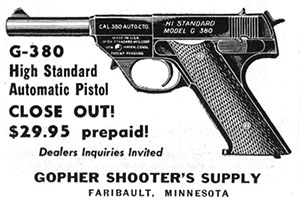
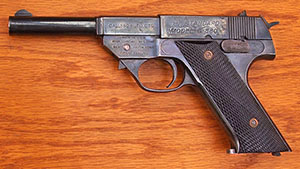
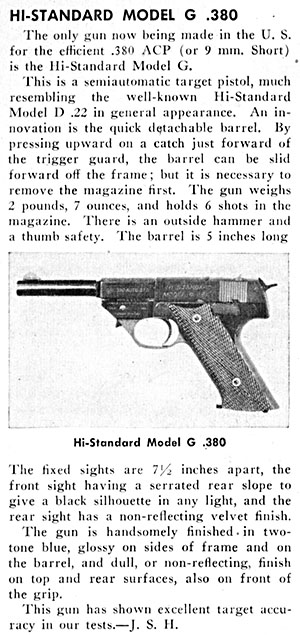
The Model H-A, with the light barrel, was first shipped on 28 March 1940. The H-A was also discontinued in 1942, with only 1042 guns manufactured. The Model H-B, with the short grip, appeared on 13 May 1940. The original Model H-B, with a 4-1/2 inch barrel, was discontinued in 1942, with 2100 having been manufactured. The H-B was reissued in 1949 with either a 4-1/2 or a 6-3/4 inch barrel. In mid 1942 the Model B was modified to become the Model B-US, with a minor change to the shape of the grip. Shipment to the government began on 8 September of that year. The U.S.A. Model H-D was an H-D with the addition of an external safety and fixed sights. After the war an adjustable sight was added to make the Model H-D Military, available in two barrel lengths, which was High Standard’s best-selling gun for nearly 20 years. Before the war ended High Standard also made over 2000 Model H-D pistols with integral suppressors for use by OSS agents and assassins, which were designated the U.S.A. Model HD -MS, though they were marked Model HD. The Development of the Model G .380 Late in 1944, High Standard began development of a centerfire automatic pistol, under government contract. The intention was to make a suppressed pistol like the HD-MS chambered for various centerfire cartridges, including the .25 ACP, .32 ACP, .38 Special, .32 S&W Long, and 9mm Luger. A heavier frame was designed for the larger cartridges, based on the H-D, but with a removable barrel secured by a spring-loaded latch in front of the trigger guard. The removable barrel meant the breech-block/slide could be removed from the front of the pistol instead of the rear (a desirable safety feature), and the lever that allowed removal of the slide from the rear on the earlier pistols, as well as the spring-tensioned slide stop, could be eliminated. The war ended with only a single gun having been delivered to the OSS, and the government canceled the contract. High Standard received a payout for work already done and had heavy frames that were already fabricated so they decided to use them to make a commercial pistol. The 38 Special and 9mm Luger cartridges had proven too powerful for an unlocked breech design, so the .380 ACP cartridge was chosen. According to Petty, production of the G .380 began late in 1947, with serial numbers beginning at 100 and running up to 7551. However, John Stimson, who has been gathering High Standard data for many years, says that the highest serial number was 7881 and that at least one gun is known with a serial number under 100. I assume they made almost 7800 Model G’s because that is how many frames they had left over from the government contract. The original price was $55. The gun was a commercial failure. Advertising by High Standard for the G .380 was scanty at best—it was only mentioned, almost as an afterthought, in advertisements for other models, and almost never pictured. The earliest advertisement I have found that included a photograph of the G .380 is from the 1948 Stoeger catalog, when the gun was just out.
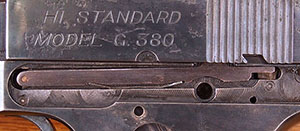
The removable barrel design of the G series guns eliminated the need for the spring-loaded fold-down slide stop, which had always been a weak point. The higher pressures of center-fire cartridges required a much stronger slide stop and a design that did not allow the slide to come off the gun to the rear.
Refinishing a G .380 Pistol
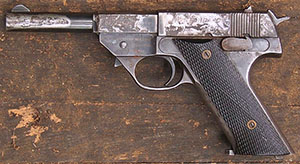
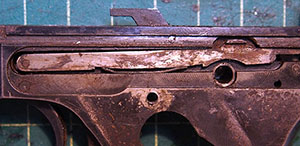
I considered for a time how much further I should disassemble the gun, but because the trigger and trigger pull pin were rusted I decided I needed to remove them along with the trigger spring and plunger. The pull pin had to be removed first from the top of the trigger, using a small hammer and punch, then I used a larger punch and hammer to remove the trigger pin. The barrel release catch also had some rust on it, so I decided to remove it and its spring as well. I decided not to remove the hammer or any parts of the hammer assembly, nor did I disassemble the slide. Polishing
This was a learning project for my son and I both, and we worked in tandem to polish the three major components, the barrel, slide, and frame. For this purpose we used emery cloth in 220, 320, 600, and 1500 grit; a 1750 RPM buffer with 6-inch buffing wheels; and a Dremel tool with various attachments for the small parts. For information on buffing and polishing I referred to a book I have by Bob Brownell, Gunsmith Kinks, which has an entire chapter on “Metal Polishing,” and an online reference entitled “How to Buff and Polish” from Caswell Incorporated which sells all sorts of equipment and supplies for metal finishing. For the deeply pitted side of the barrel and slide we started with a sisal wheel and a carborundum compound, then moved to a sewn cloth wheel with carborundum, followed by tripoli and then rouge. We weren’t able to take the deeply pitted parts down to perfect smoothness. Perhaps we weren’t patient enough, but we also didn’t want to lose the inscriptions on the left side of the gun. We spent an entire afternoon buffing the slide, barrel, and frame. For smaller parts we used the emery cloth, followed by buffing with a small buffing wheel on the Dremel tool. We followed the black carborundum compound with brown tripoli and white rouge, each on a separate buffing wheel. Blueing That ‘blueing’ was originally ‘browning’ is reflected in the French term ‘bronzage’ and the German terms ‘Brünieren’ and ‘Bronzieren.’ All are essentially a controlled rusting or oxidation of the surface of the metal, intended to reduce reflectivity and protect the metal surface from uncontrolled oxidation. A traditional rusting solution will cause the metal to turn light grey at first and eventually, with repeated applications, brown. Between applications of the solution the metal is ‘scratched’ with a steel brush or steel wool. In order to get a blue or black color the metal is boiled or steamed between applications. The blueing and scratching (and boiling) operations are repeated a number of times, until the desired color is achieved.
Oxpho Blue contains selenious acid, phosphoric acid, copper sulfate, and nickel sulfate. The rust-inhibiting properties of phosphoric acid are well known, so it is an ideal acid to use in a bluing solution. The copper and nickel salts produce the blue color. Oxpho Blue comes in two forms, a liquid and a thick paste. I bought both and have found them both useful. I reblued a little Baby Browning one time and I could swear that the paste gave me a better result, but when reblueing the Hi Standard G .380 we found that the liquid seemed to work better, so I think they are both worth having. In my experience, every piece of metal takes the color differently and different types of metal will give slightly different colors.
But, since I first tried these solvents for cleaning gun parts, a friend who is in the jewelry business gave me an ultrasonic cleaner: he had upgraded to a larger, better model. I filled the ultrasonic cleaner with an ammonia solution. Household ammonia traditionally comes in a concentrated solution, but what the grocery store carries now is considerably diluted and they also add a lemon scent to make it smell better. I used about one part of this already dilute ammonia solution to four parts water. The small parts, barrel, and slide were placed in a basket which was suspended in the solution and cleaned on high, with heat, for 40 minutes. The frame was suspended in the solution in such a manner that it did not touch the walls of the tank and was also cleaned for 40 minutes in a fresh heated solution. Once the parts were cleaned, we handled them with gloves only. This is essential with traditional blueing because any trace amounts of oil or grease from the hands will produce an uneven blue. It is less critical with Oxpho Blue, but because we intended to wear gloves for handling the blueing solutions anyway, we put on our gloves at this point and kept them on until we were finished. I recommend gloves anytime you are using blueing solutions, which almost all contain toxic heavy metals. The process followed was: heat with a heat gun so it’s hot to the touch but not so hot you can’t pick it up with gloves on (if it melts your gloves it’s too hot), apply solution, let sit for several minutes, scratch with steel wool until all mottling is removed, then repeat. Each part received approximately twenty applications before it reached the desired color. Brownell recommends 0 or 00 steel wool, but 0000 was what we had on hand, and it seemed to work fine. Toward the end we began to use less heat and to apply the paste form of the Oxpho blue with a soft cloth, as if it were a polishing compound. We rubbed the paste into the finish, then took a dry soft cloth and rubbed away any excess, burnishing the metal with the soft cloth. We finished by oiling the newly-blued surface thoroughly. The entire cleaning and bluing process took the two of us about six hours. Making a Spring
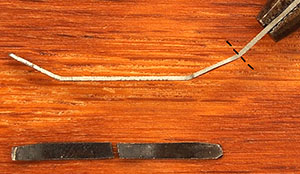
I welcomed this as an opportunity to try my hand at making a spring, which is a traditional gunsmith activity. Gunsmith Kinks has a whole chapter on ‘Spring Making’ which I read with interest. I also found an article in the American Rifleman for February of 1960 (page 39) with some useful information. Finally, there is a lot of information on YouTube about making springs. In particular, I found a series of three videos by an old British master gunsmith, Jack Rowe, to be especially useful. The spring I needed to make was much smaller, but the process was essentially the same.
To take the temper off the steel, I needed to anneal it, which is to say I needed to heat it until it glows orange and then let it cool slowly. I tried using my little Bernzomatic propane torch on it, but it just wasn’t hot enough. Fortunately, I have a friend who makes jewelry and has a torch that uses propane and oxygen. I took my piece of steel to his workshop where it took less than ten seconds in the flame to have my sheet steel glowing orange. I let it cool until I could pick it up with my fingers, then used his little German microsaw and metal jig to saw four pieces about 1 millimeter wide and maybe 30 millimeters long. I don’t think I could have done it without my friend’s specialized jewelry-making equipment.
When I inserted the spring into the gun it fit perfectly, and the transfer bar was properly tensioned. The gun now functions correctly.
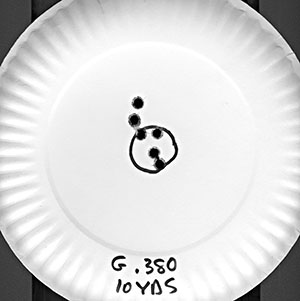
At the Range with the G. 380 The trigger is not the best, but far from the worst I have tried. It has a short travel and breaks cleanly, but at about six pounds. For target shooting I would prefer something closer to two-and-one-half or three pounds. The front sight is relatively thin, but the rear sight has a wide notch, so there is a lot of daylight on either side—not exactly target sights. With a full magazine, I found it almost impossible to get the magazine seated so that it latches properly. I resorted to loading only four rounds at a time. The G .380 fed hardball ammunition with no problems. I had an occasional problem with hollow point ammo chambering properly, but I was using very cheap ammunition that causes that problem with a lot of guns. The gun is more accurate than I am. At my age I can see the front sight clearly, or I can see the target clearly, but not both. Field Stripping
|
||||||||||||||||||||||||||||||||||||||||||||||||||||||||||||||||||||||||||||||||||||||||||||||||||||||||||||||||||||||||||||||||||||||||||||||||||||||||||||||||||||||||||||||||||||||||||||||||||||||||||||||||||||||||||||||||||||||||||||||||
|
||||||||||||||||||||||||||||||||||||||||||||||||||||||||||||||||||||||||||||||||||||||||||||||||||||||||||||||||||||||||||||||||||||||||||||||||||||||||||||||||||||||||||||||||||||||||||||||||||||||||||||||||||||||||||||||||||||||||||||||||
|
Copyright 2016 by Ed Buffaloe. All rights reserved. |
||||||||||||||||||||||||||||||||||||||||||||||||||||||||||||||||||||||||||||||||||||||||||||||||||||||||||||||||||||||||||||||||||||||||||||||||||||||||||||||||||||||||||||||||||||||||||||||||||||||||||||||||||||||||||||||||||||||||||||||||
|
|
||||||||||||||||||||||||||||||||||||||||||||||||||||||||||||||||||||||||||||||||||||||||||||||||||||||||||||||||||||||||||||||||||||||||||||||||||||||||||||||||||||||||||||||||||||||||||||||||||||||||||||||||||||||||||||||||||||||||||||||||
